↑ Top
Orivia Shipping · 1.2.0 · Click-by-Click Manual

Follow the screenshots, from booking to invoice

This manual uses real AutoCount screenshots to walk you through one complete shipment: Booking → Shipment Job → Container → Bill of Lading → Charges → billing (SO → DO → Invoice) → Reports, plus Smart Document Import. Every step is just three things: ① where to click ② what to type ③ what you'll see.

How to use this manual

Start at Step 1 and follow along. Each step has three colour-coded tags — that's all you need to watch:

👆 Click ⌨️ Type ✅ You'll see

Whenever the screen matches the "You'll see" description, this step is correct — move on with confidence. Document numbers (BKG, JOB, SO…) count upward automatically, so different numbers on your screen are perfectly normal.

The example shipment

We'll do this one shipment together

Every screenshot below is from the same real shipment. When you do it yourself, just swap in your own customer and cargo.

One export sea-freight shipment — from Port Klang to Jakarta.
Customer: PANDA LOGISTICS SDN BHD (300-P001)
Route: PORT KLANG → JAKARTA
Vessel / Voyage: EVER ACE / V001
ETD: 12/10/2026   ETA: 15/10/2026
Container: TCKU1234567 / 40HC / SEAL001
Charge: OCEAN FREIGHT 2000 (tax SR-0)
The big picture first

Six big stages of one shipment

Remember this line: book first, open the job, attach the container and issue the B/L, enter the charges, then bill in AutoCount, and review in the reports at month-end.

1BookBooking
2JobShipment Job
3Container + B/LContainer + B/L
4ChargesCharges
5BillSO → DO → Invoice
6ReportsReports
Contents

All steps

Part 1

Core mainline: one shipment end to end

15 small steps, from booking all the way to raising the invoice and reading a report. Anything you Save is kept, so you can close and continue tomorrow at any point.

1
Open the Shipping menuShipping menu
👆 Click

On AutoCount's top menu bar, click Shipping.

✅ You'll see

The Shipping menu drops down: Dashboard, Document Import, Booking, Shipment Jobs, Bill of Lading, Reports, Setup… This is the entry point for everything in the plugin.
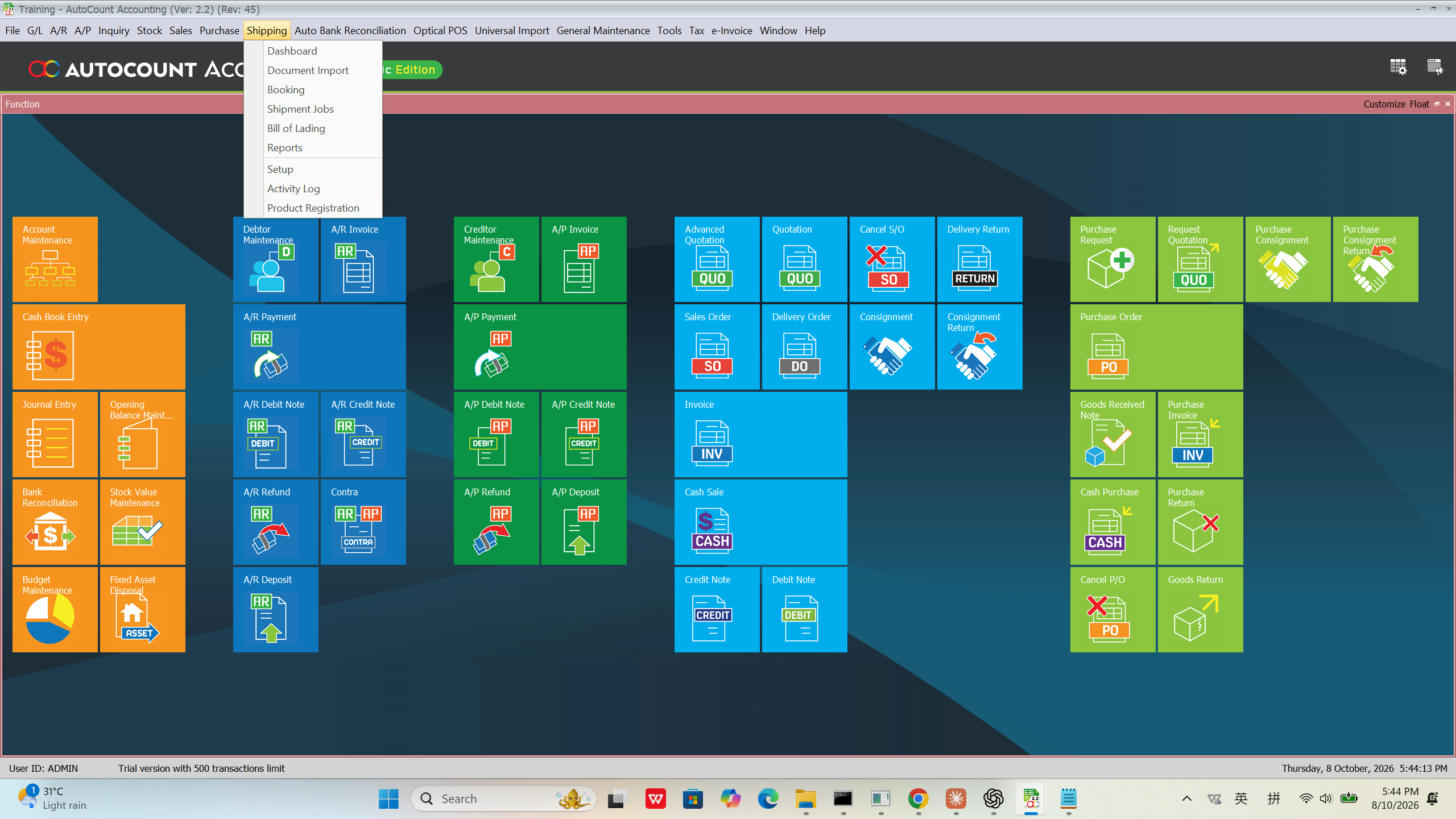
Shipping menu open
The Shipping menu — every task starts here.
2
Create a BookingShipping → Booking
👆 Click

In the Shipping menu click Booking, then click New at the top-left of the booking list.

✅ You'll see

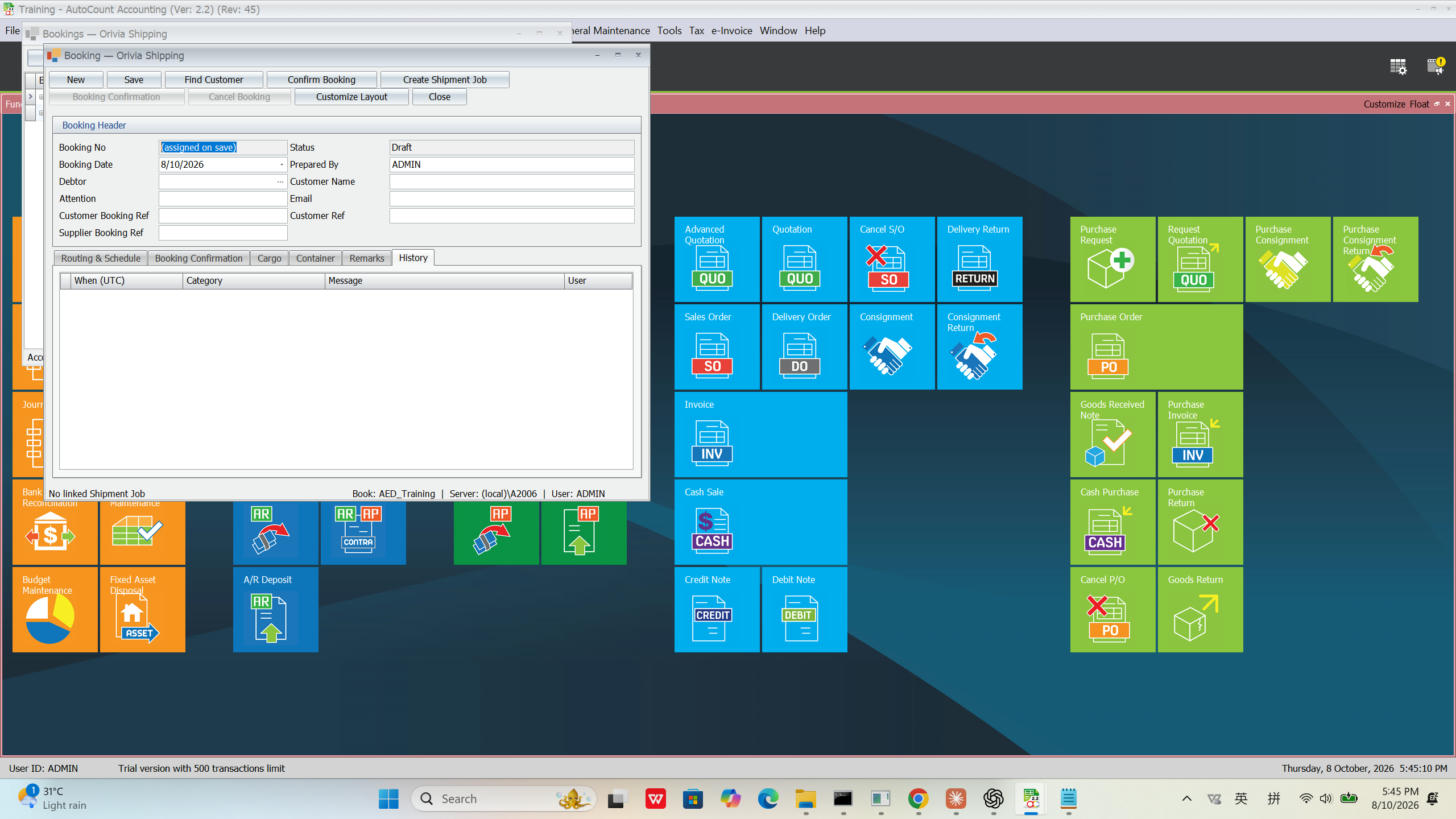
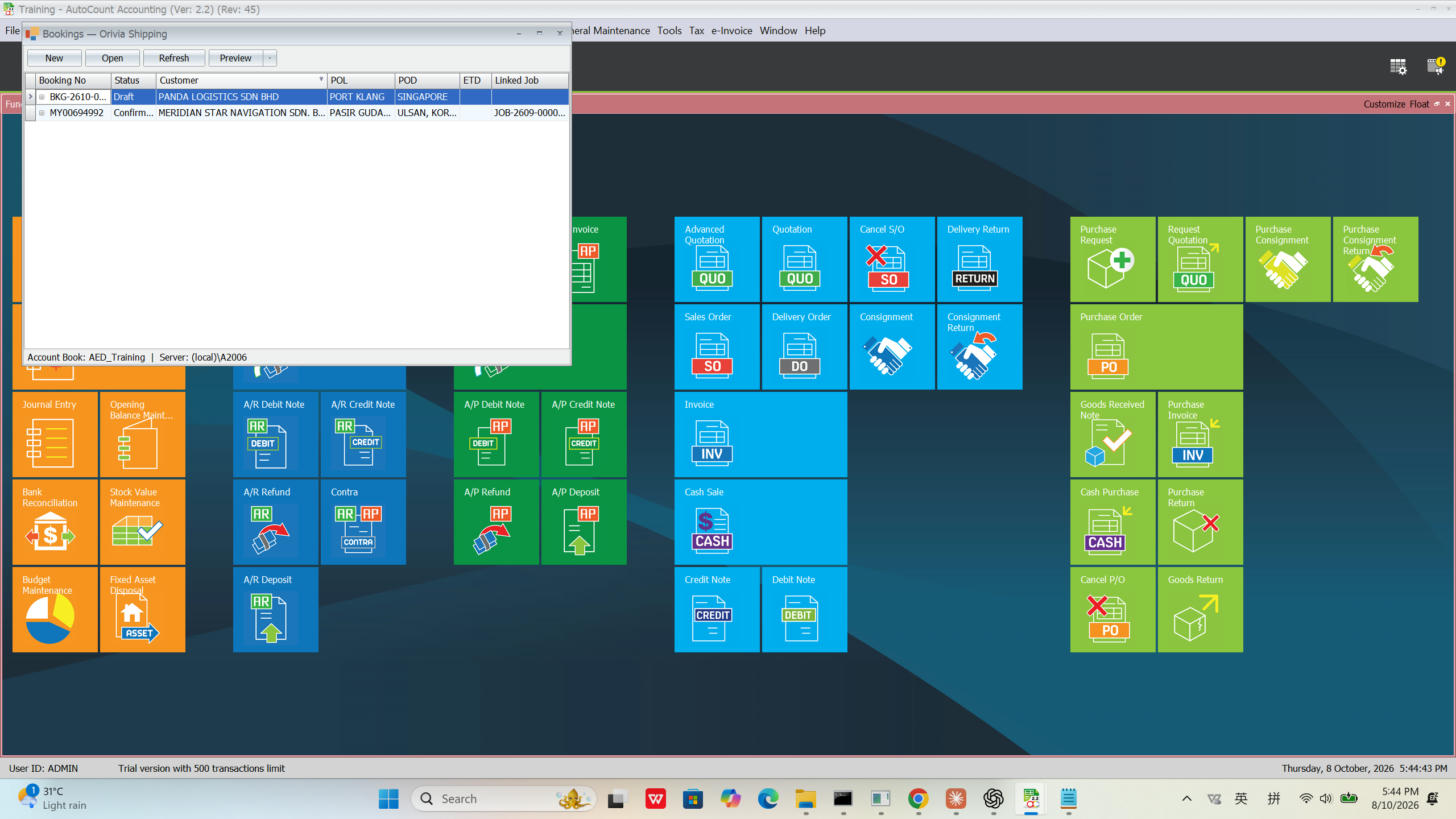
First a list of existing bookings; after New, a blank booking form waiting for the customer and route.

Booking list
The booking list — click New for a fresh one.
Blank booking form
A blank booking — we'll fill it in next.
3
Pick the customerFind Customer
👆 Click

Click Find Customer (or the … button next to the customer field).

⌨️ Type

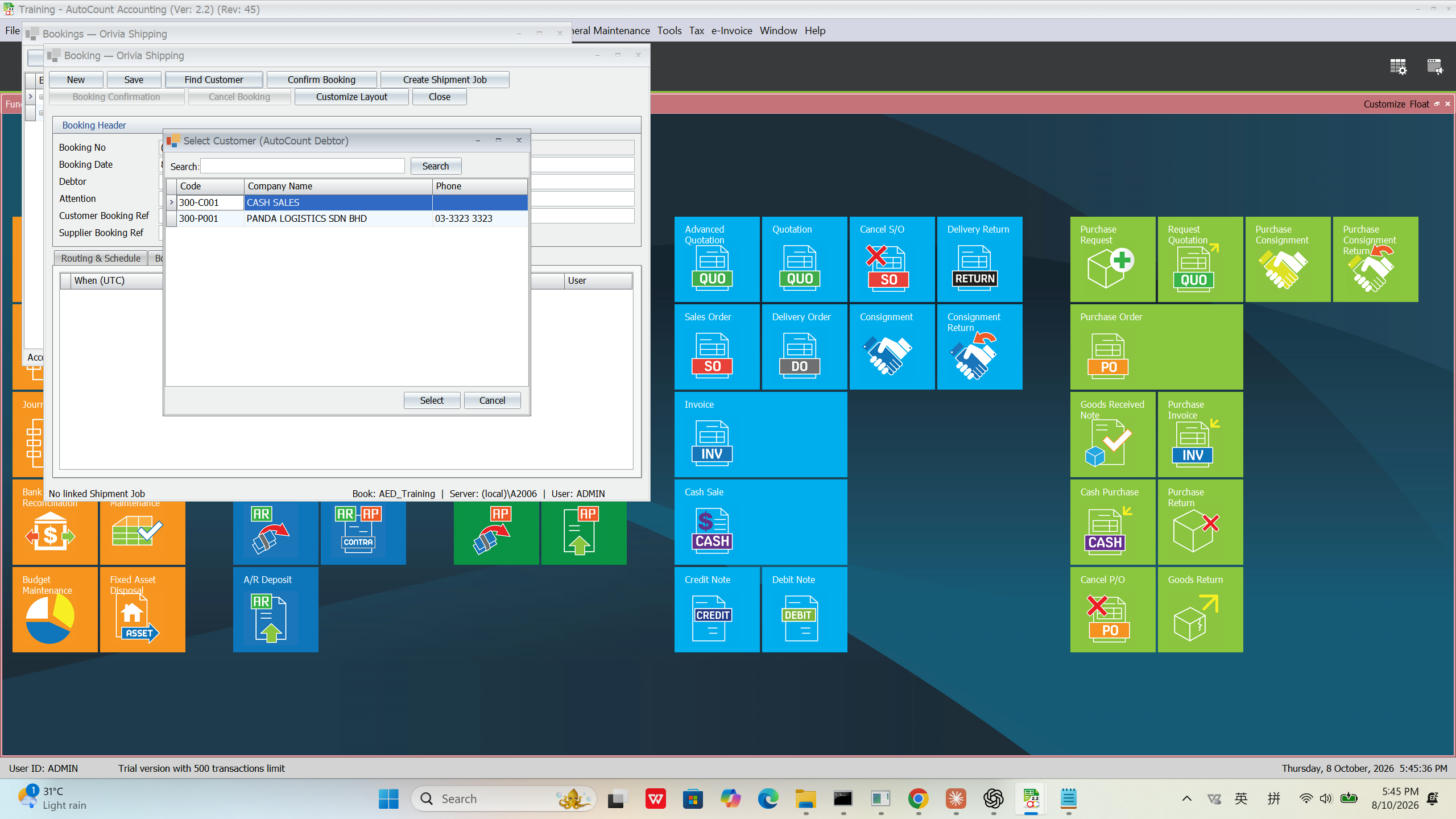
In the customer list, pick PANDA LOGISTICS SDN BHD and double-click or press OK.

✅ You'll see

The customer name and code (300-P001) fill back into the booking. You pick the customer once — the job, B/L and reports carry it forward automatically.

Select customer
Pick PANDA LOGISTICS SDN BHD from the list.
4
Fill in route & schedulePOL / POD / Vessel / ETD / ETA
👆 Click

Click into each field of the routing area on the booking.

⌨️ Type

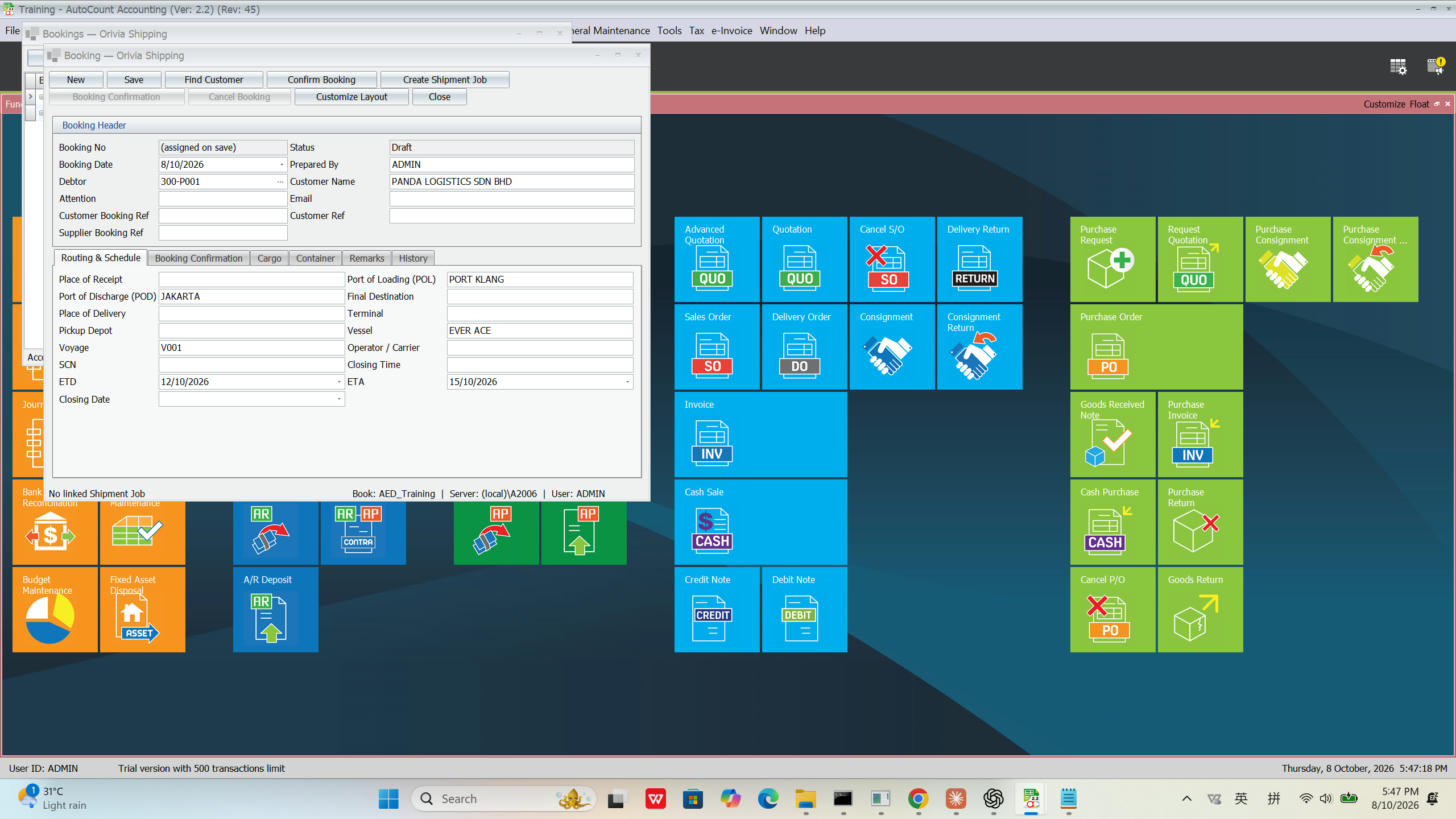
POL = PORT KLANG; POD = JAKARTA; Vessel = EVER ACE; Voyage = V001; ETD = 12/10/2026; ETA = 15/10/2026.

✅ You'll see

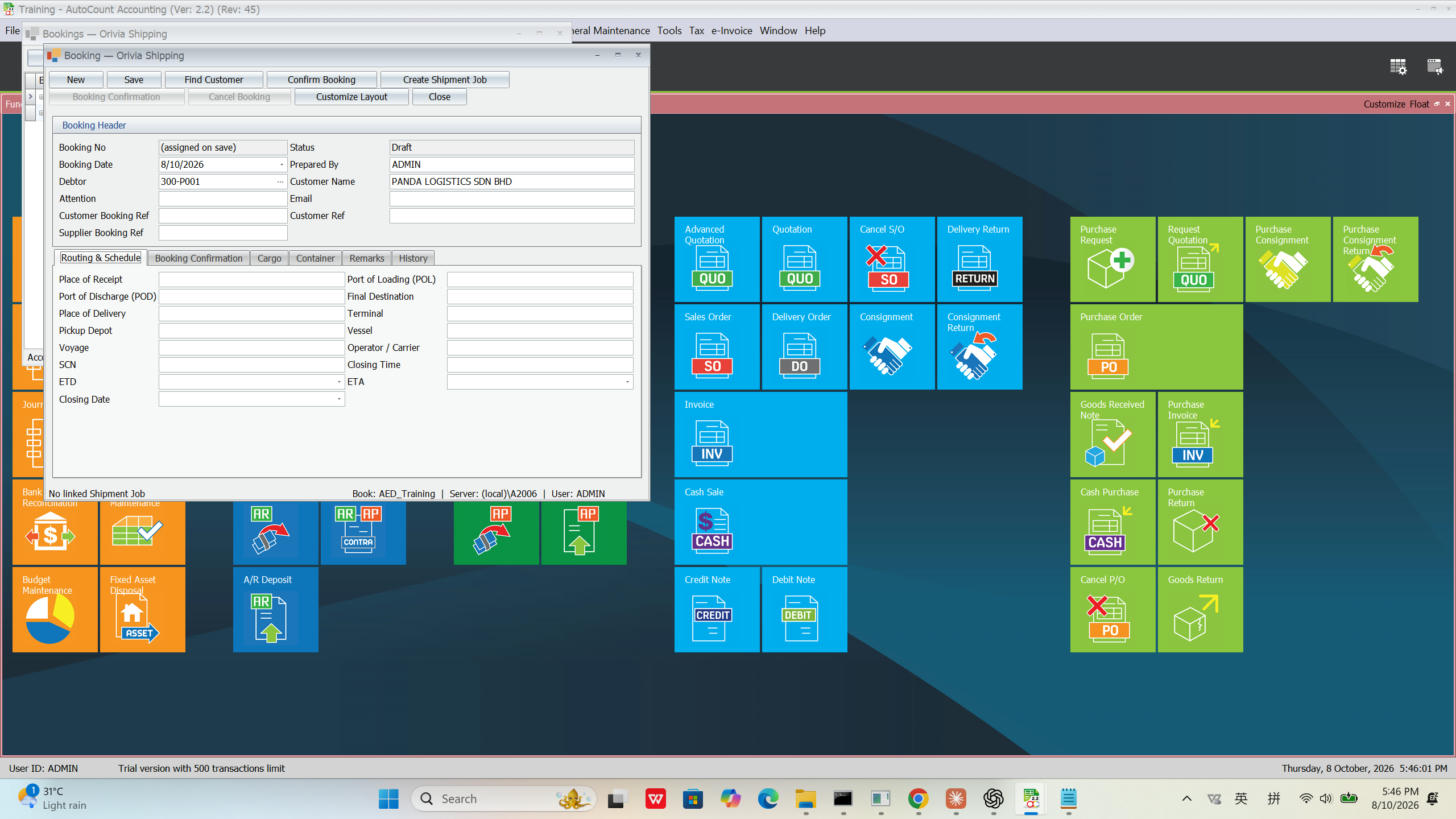
It goes from "all blank" to "every field filled". Match the two pictures below, then you're done.

Routing blank
Before — routing all blank.
Routing filled
After — ports, vessel/voyage and schedule all in.
5
Save the BookingSave
👆 Click

Click Save at the top.

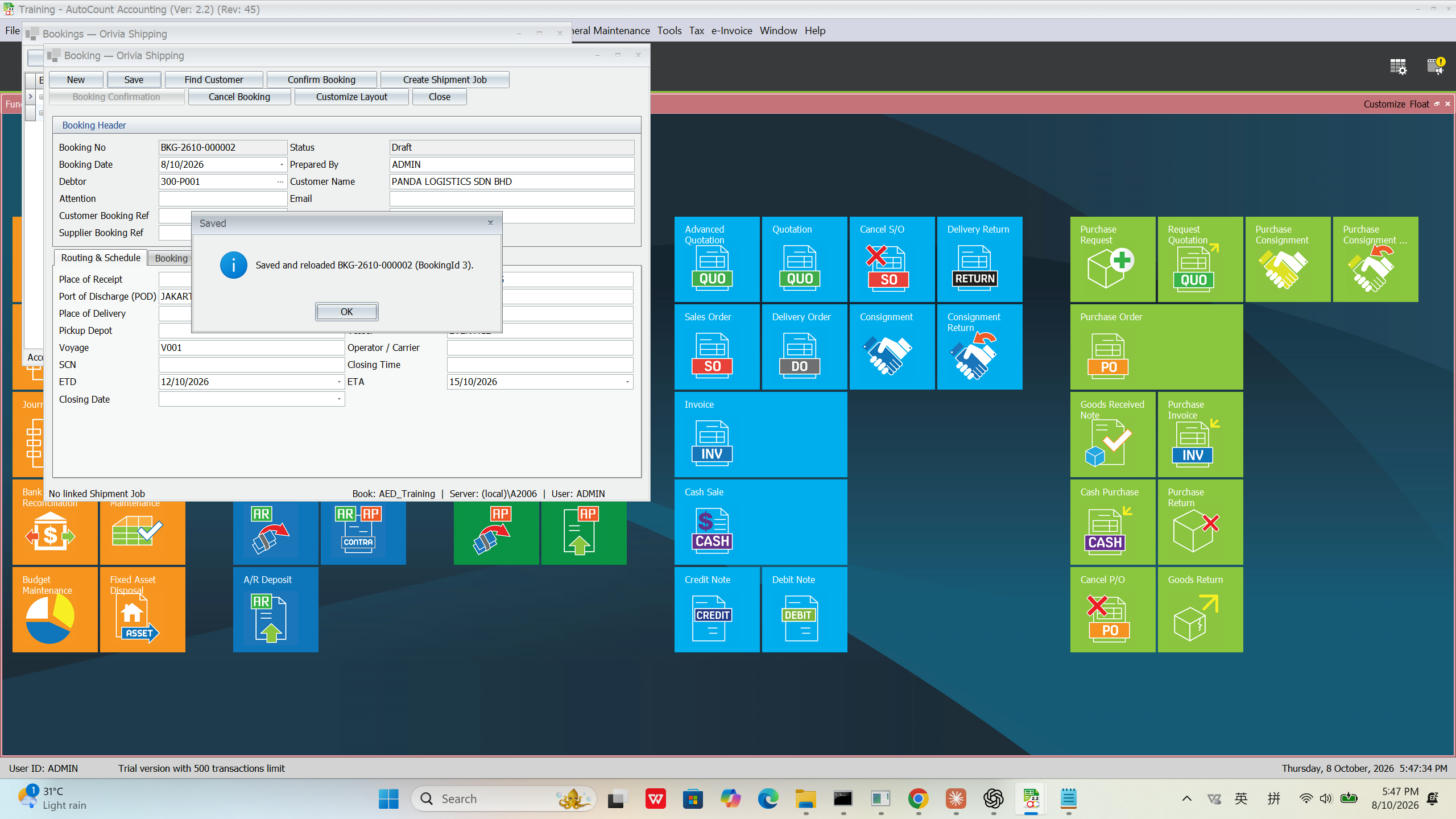
✅ You'll see

The system gives this booking a number, e.g. BKG-2610-000002. Seeing a number = saved successfully.

Booking saved
After saving, booking number BKG-2610-000002 is generated.
Stop anytime: once saved, you can close the window without losing anything — reopen it later from the Booking list.
6
Confirm the BookingConfirm Booking
👆 Click

Click Confirm Booking.

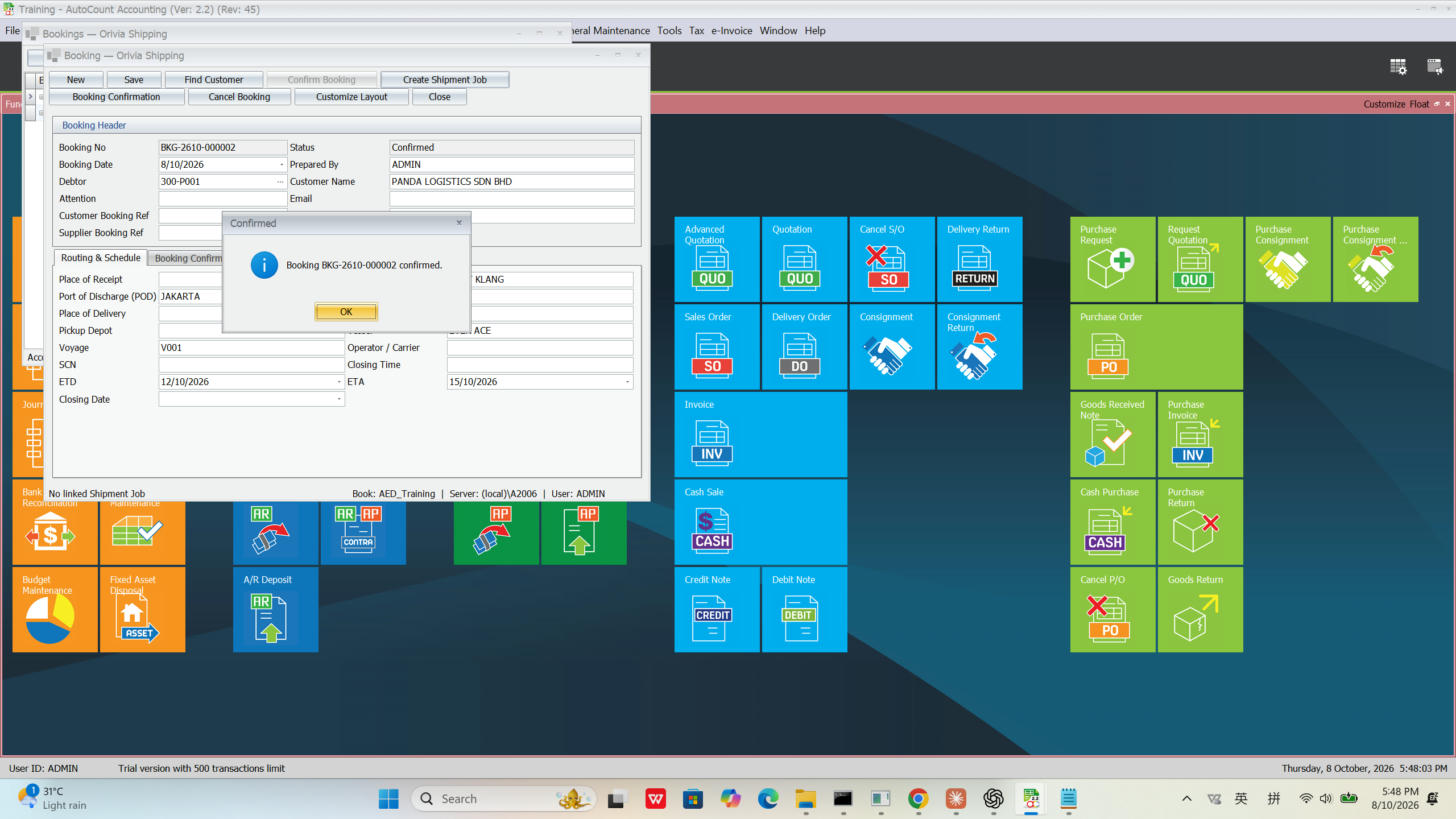
✅ You'll see

The booking status changes from Draft to Confirmed. Only a confirmed booking can create a job.

Booking confirmed
Status is now Confirmed — ready to open the job.
When do you use a Booking? The moment a customer asks "do you have space / book me a container", open a Booking. It just "reserves the slot" — the cargo isn't being operated yet.
7
Create the Shipment JobOne click from the booking
👆 Click

On the confirmed booking, click the create-job button (Create Job / transfer to job).

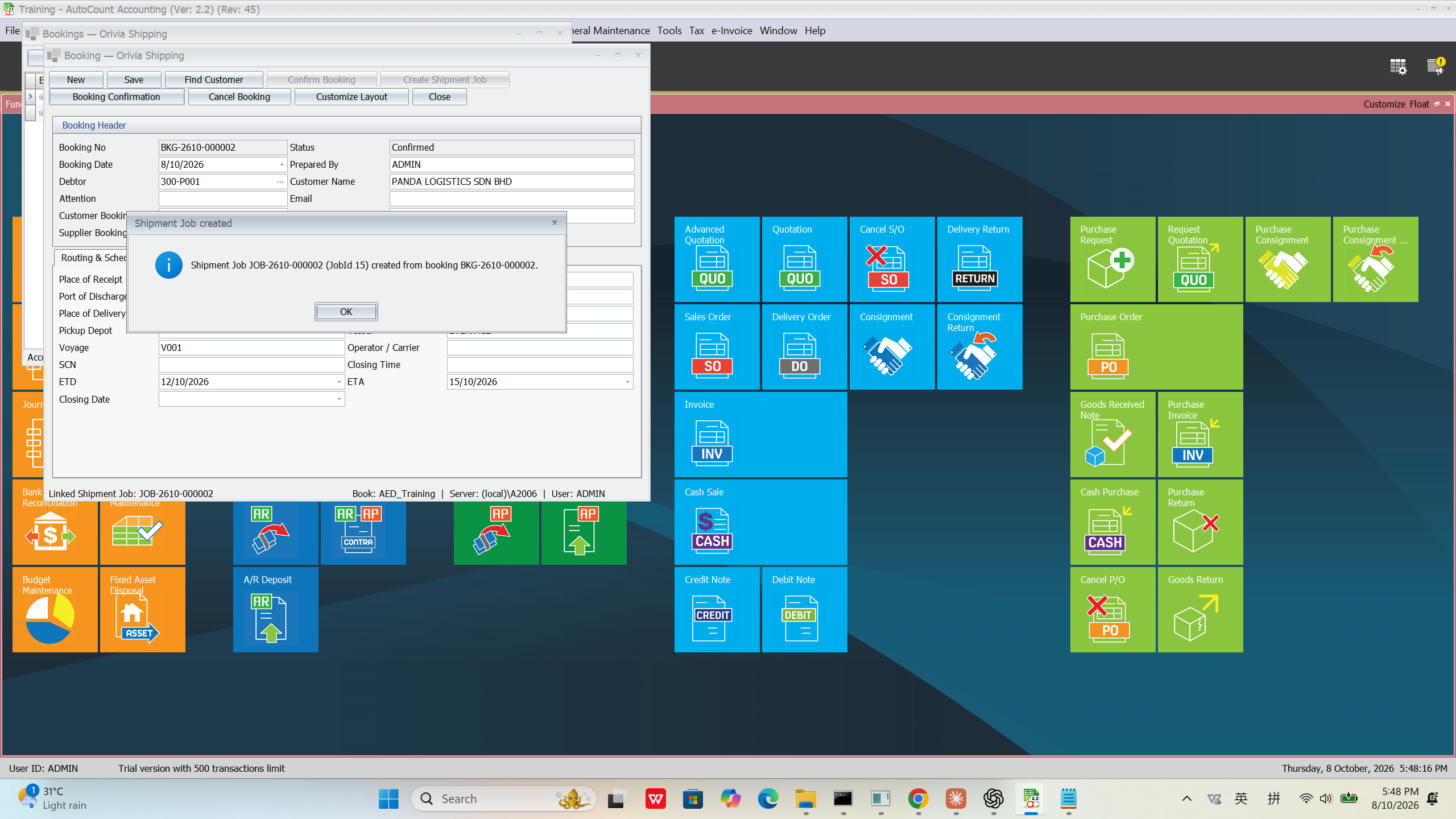
✅ You'll see

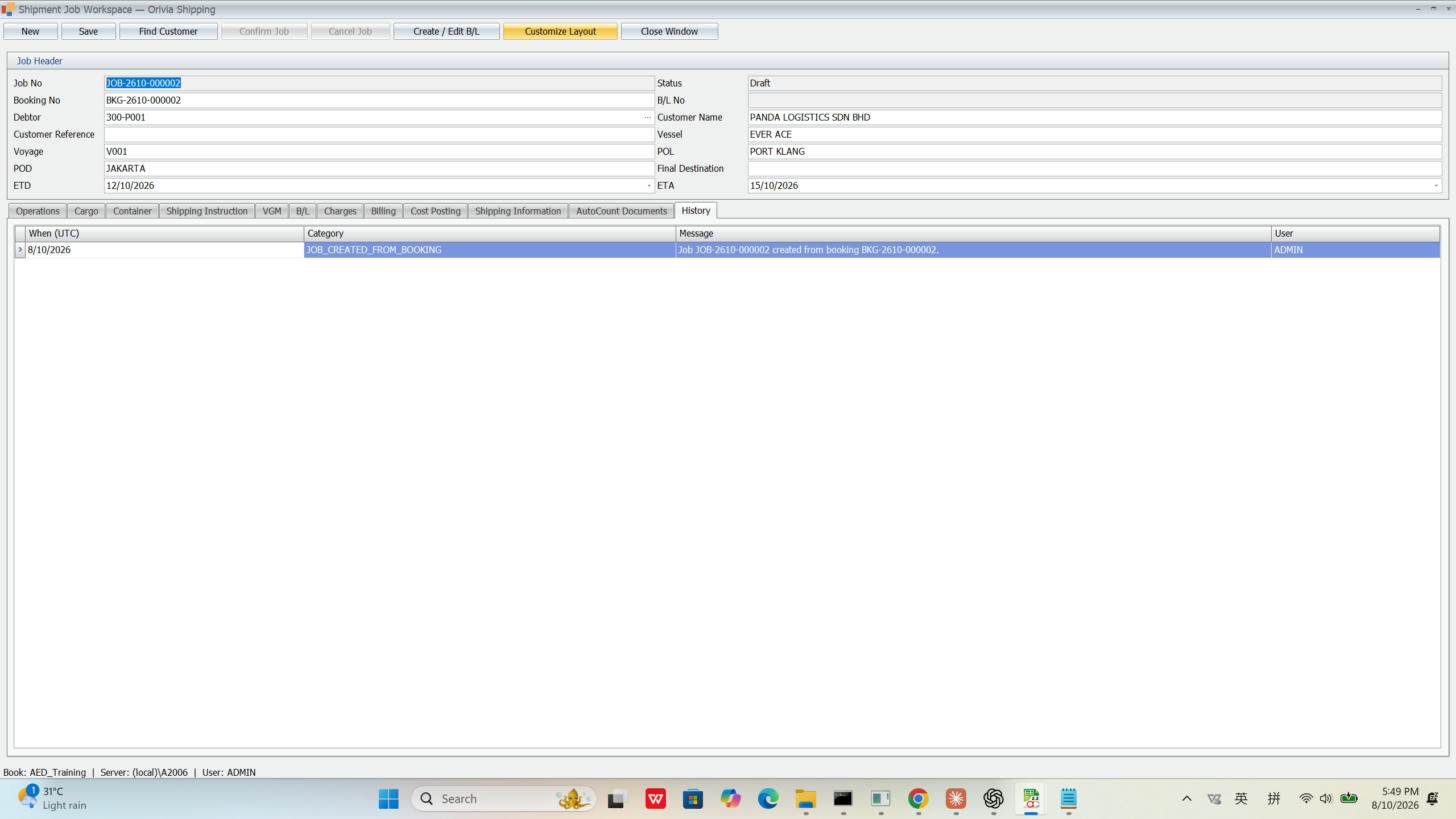
A job number is generated, e.g. JOB-2610-000002, and the Shipment Job Workspace opens. The customer, ports and schedule all carry over from the booking — no retyping.

Job created
Shipment Job JOB-2610-000002 created.
Job workspace
The workspace — header on top, then a row of tabs: Operations / Cargo / Container / B/L / Charges / AutoCount Documents… everything about this shipment lives here.
When do you use a Shipment Job? When you actually start operating this cargo (containers, B/L, charges). It's the "master file" for the shipment.
8
Add the containerContainer tab
👆 Click

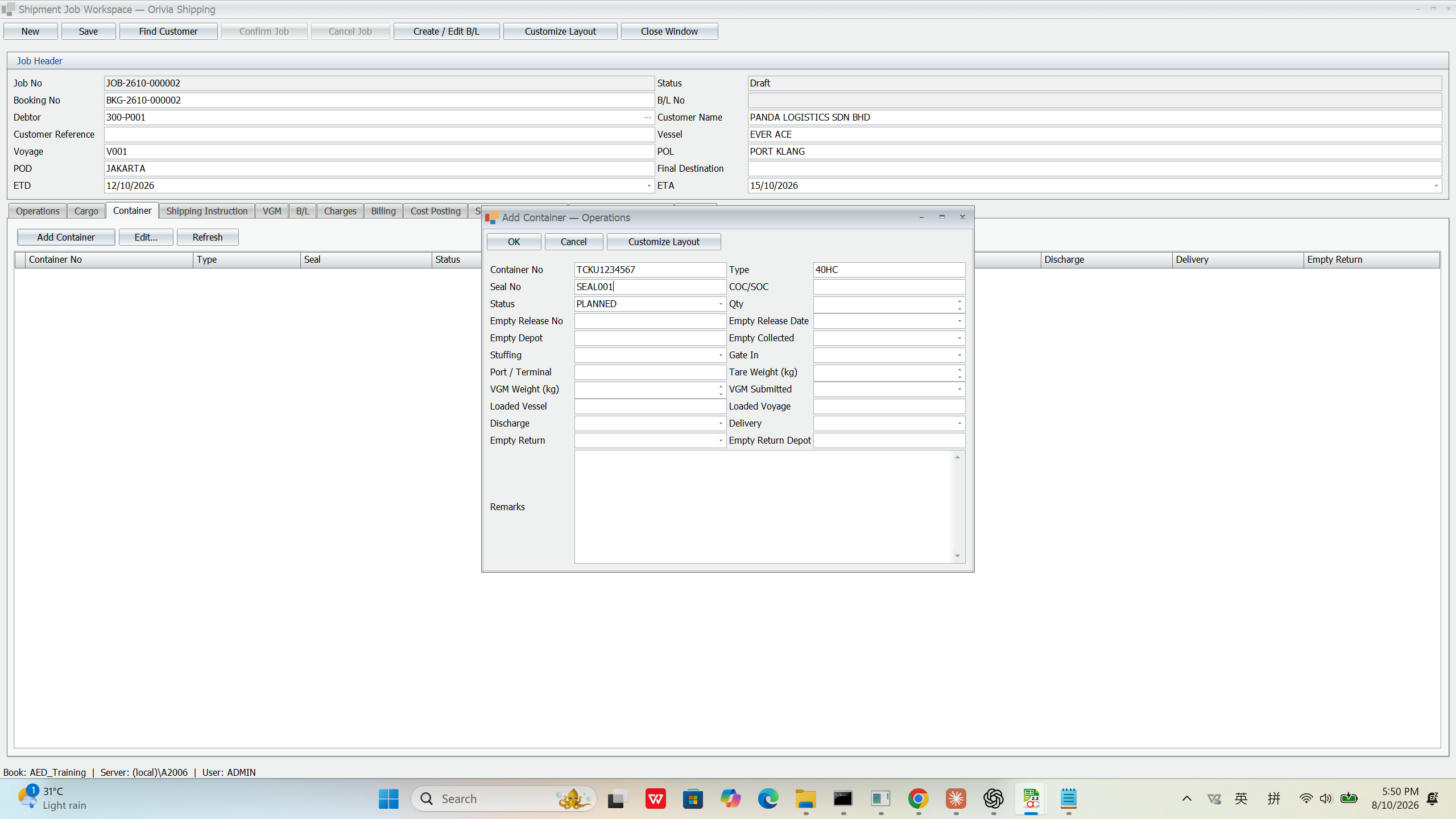
In the workspace, click the Container tab and add a container row.

⌨️ Type

Container No = TCKU1234567; Type = 40HC; Seal = SEAL001.

✅ You'll see

The row appears in the container list. The weekly volume report counts containers from exactly here.

Enter container
Enter container no, type and seal — the box booked for this shipment.
9
Issue the Bill of LadingCreate / Edit B/L
👆 Click

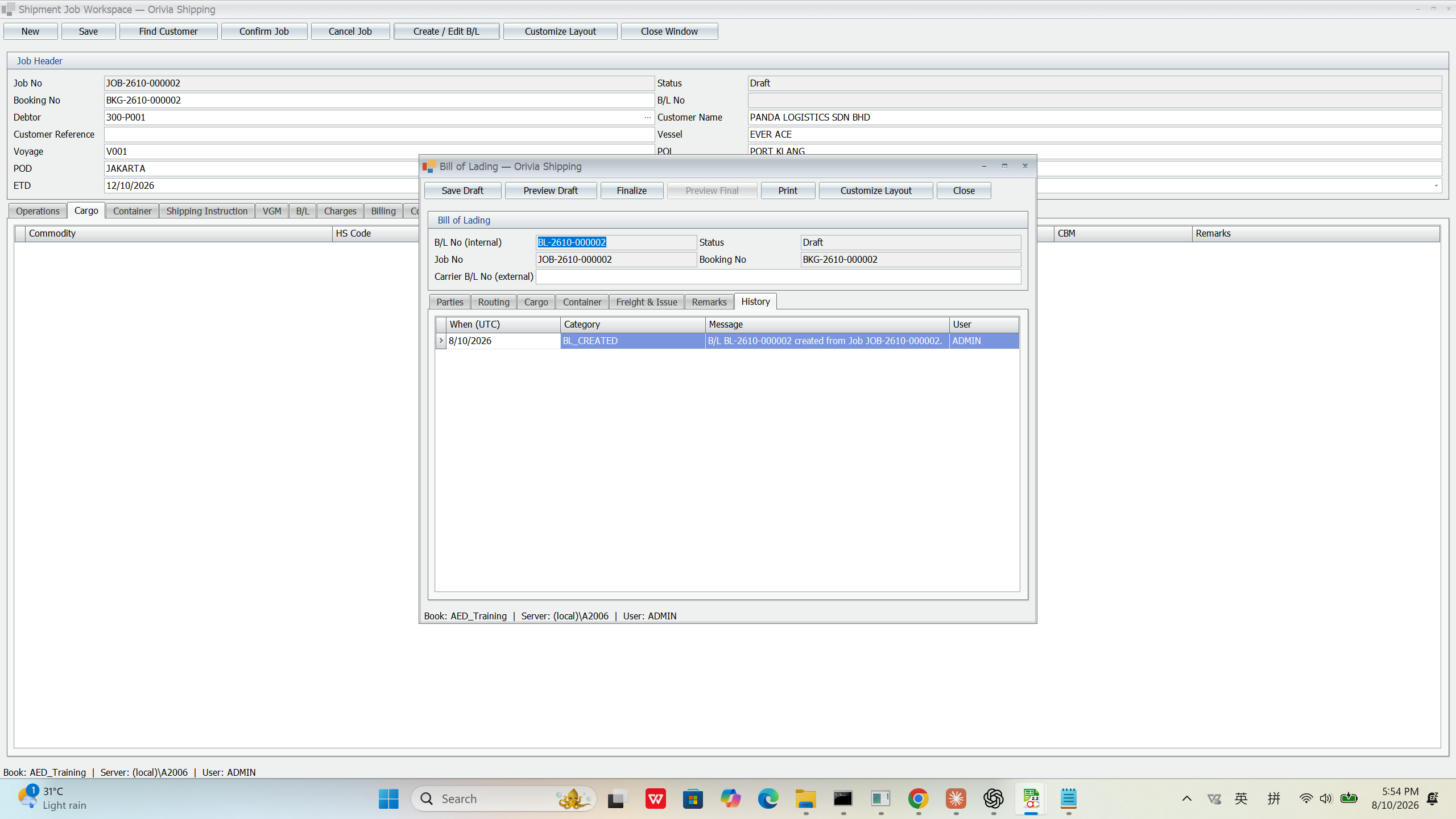
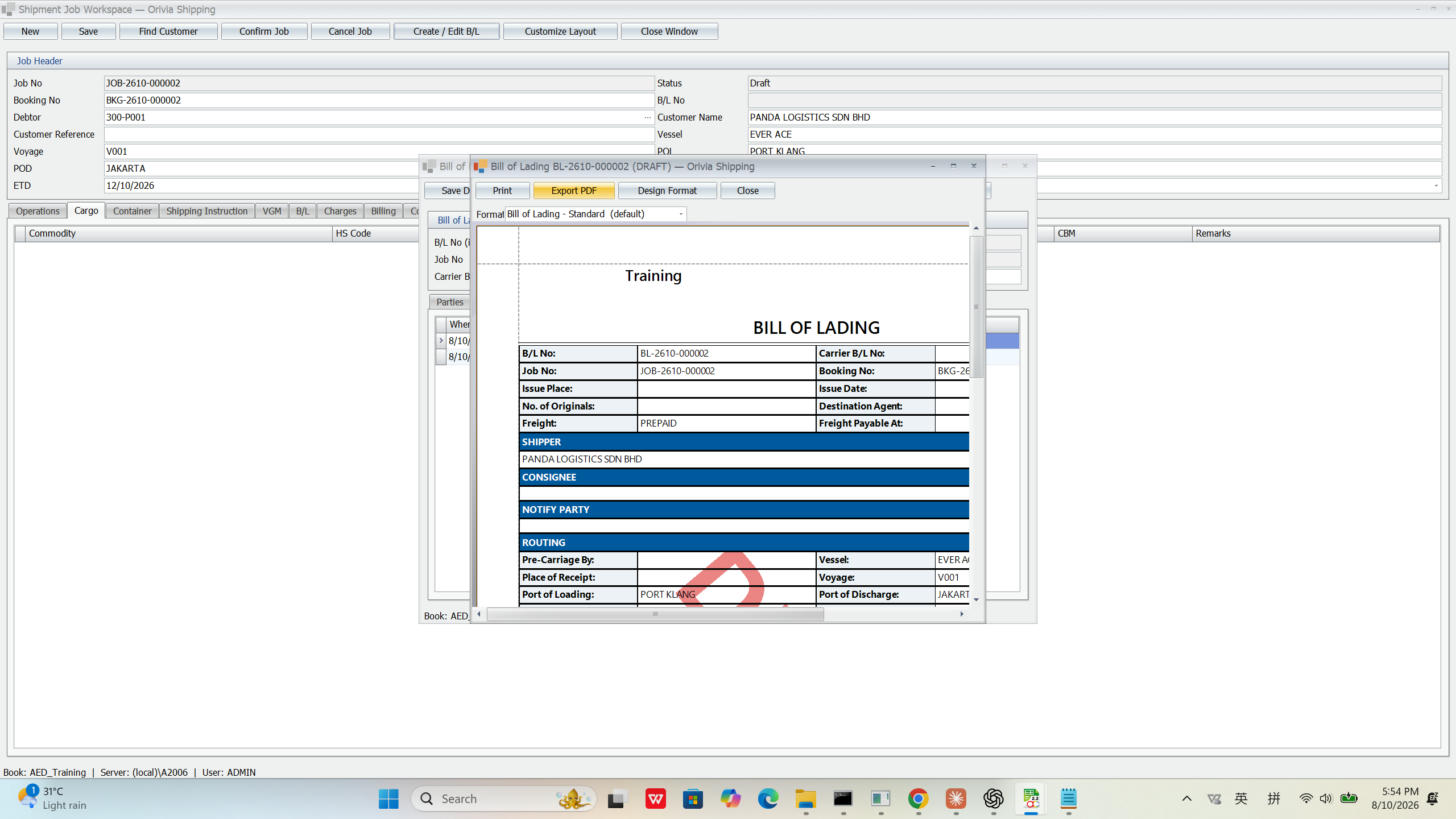
Click Create / Edit B/L to generate the B/L; click Preview to see it.

✅ You'll see

A B/L number is generated, e.g. BL-2610-000002. The preview carries a big DRAFT watermark — meaning it isn't officially issued yet, so you can check it safely.

B/L created
Bill of Lading BL-2610-000002 generated.
B/L draft preview
Draft preview — DRAFT watermark; content comes from the job, no retyping.
When do you use a Bill of Lading? When the cargo is boxed and the data is complete, and you need to issue a B/L to the carrier / customer. It's a transport document, not a bill.
10
Enter the chargesCharges tab
👆 Click

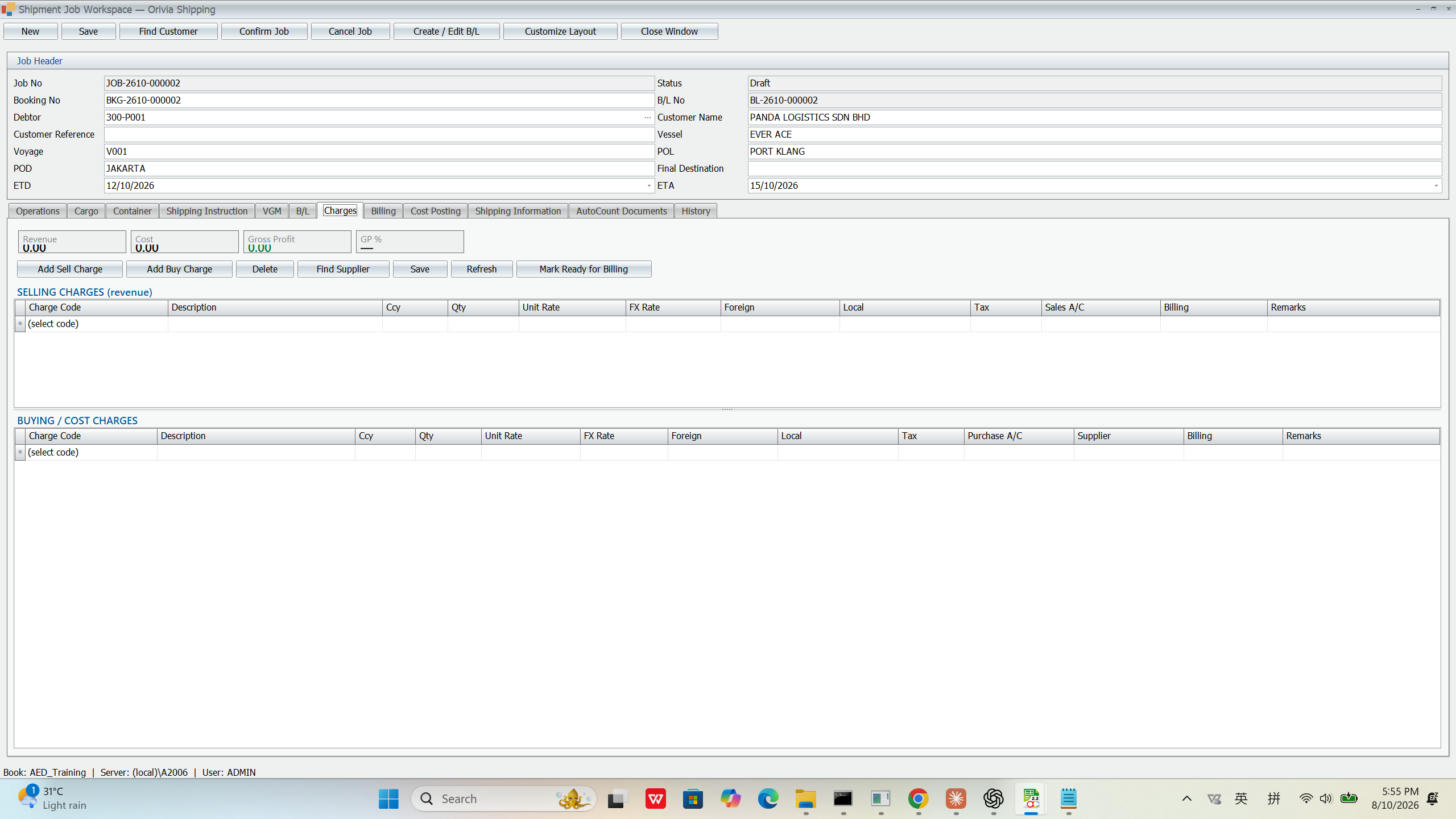
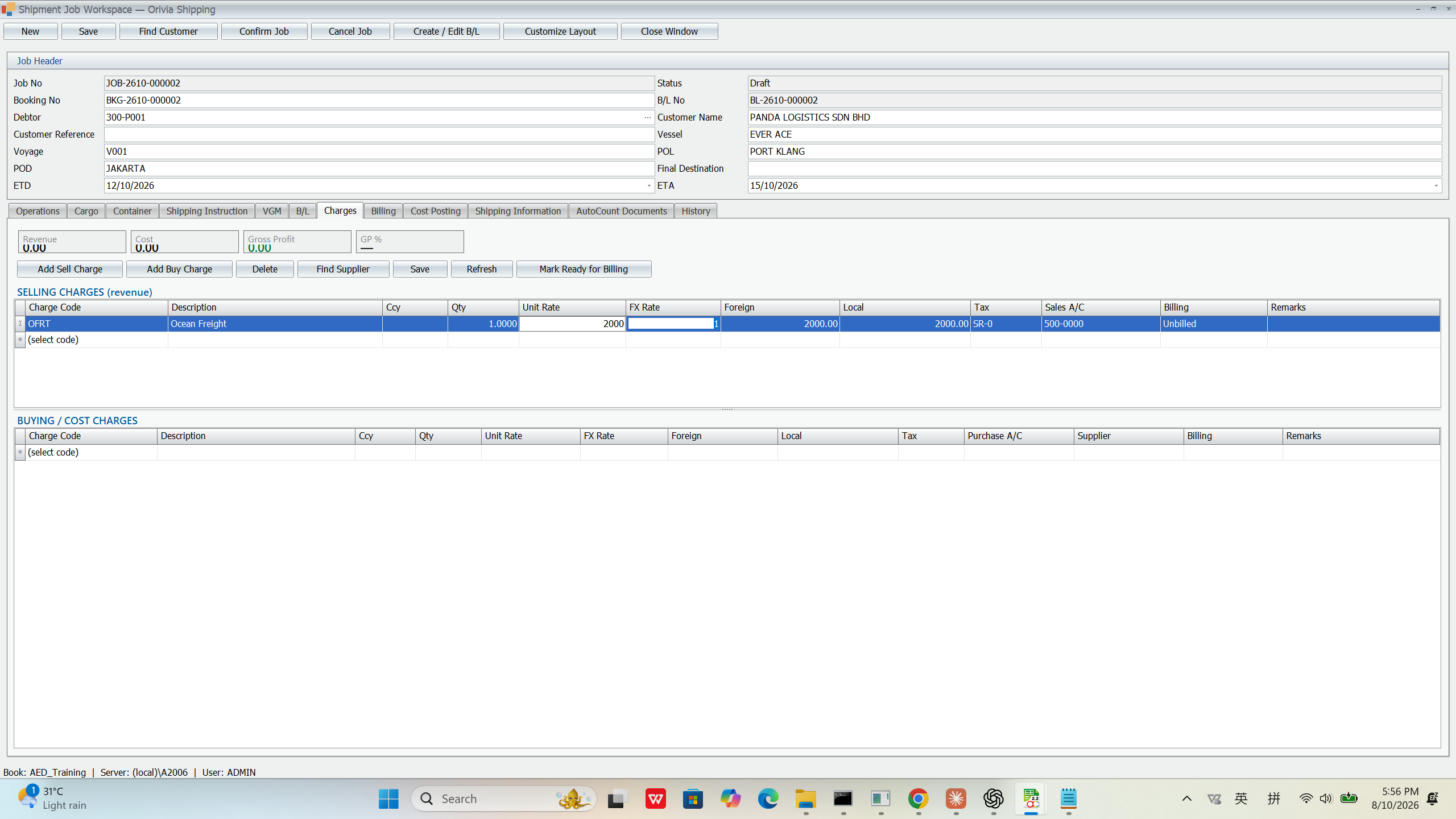
Click the Charges tab and add a charge row with side SELL (charge the customer).

⌨️ Type

Charge code = OFRT (OCEAN FREIGHT); Amount = 2000; Tax = SR-0.

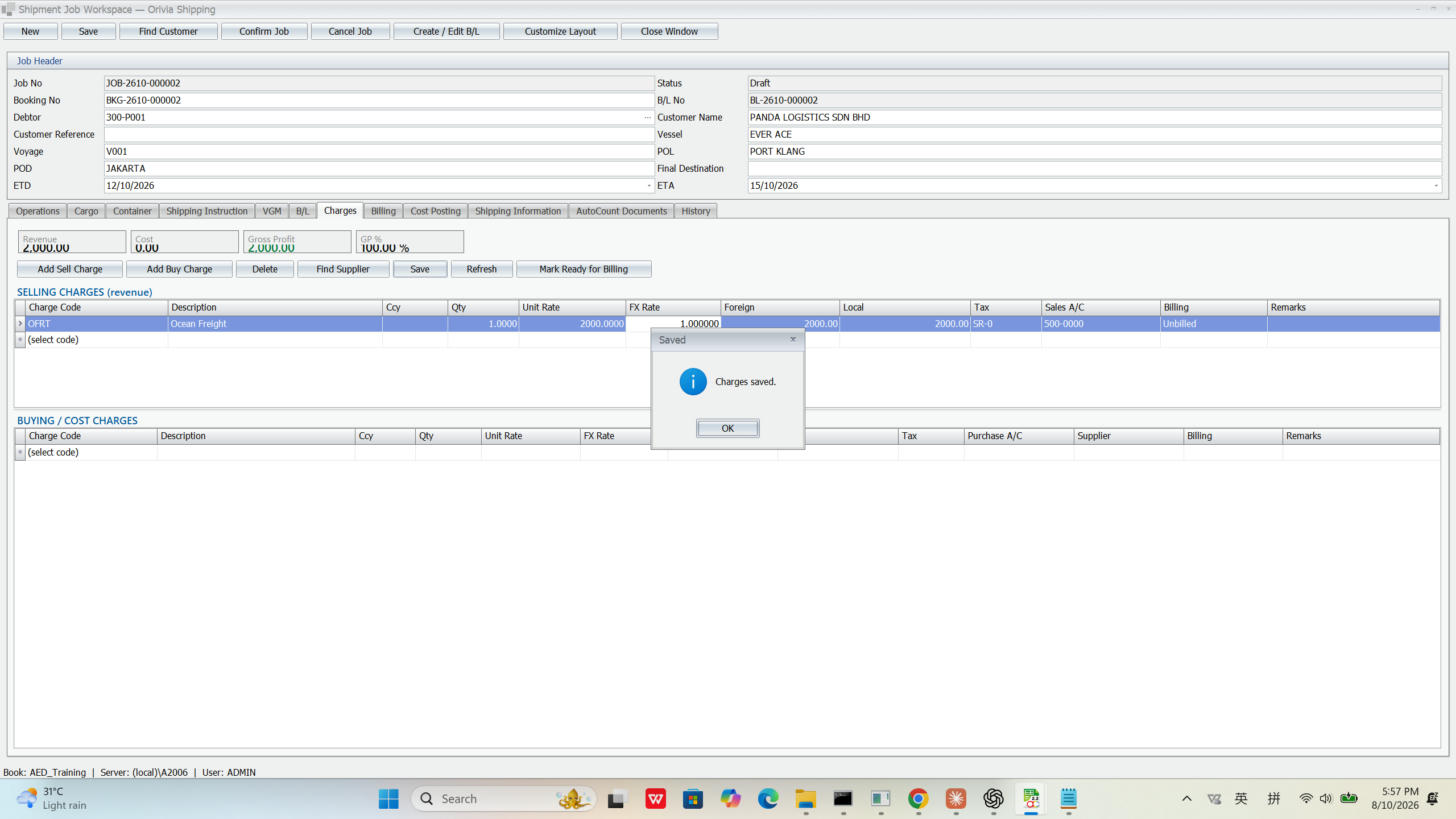
✅ You'll see

After saving, the system computes Revenue 2000, Cost 0, Gross Profit 2000. You can see what this shipment earns, on the spot.

Charges tab
Charges tab — record this shipment's revenue and cost.
SELL charge filled
One SELL charge: OFRT ocean freight 2000, tax SR-0.
Gross profit after save
After saving, Gross Profit 2000 is computed.
Key: only after you record the "charge the customer" (SELL) line can you raise an invoice later — the invoice amount comes from here.
11
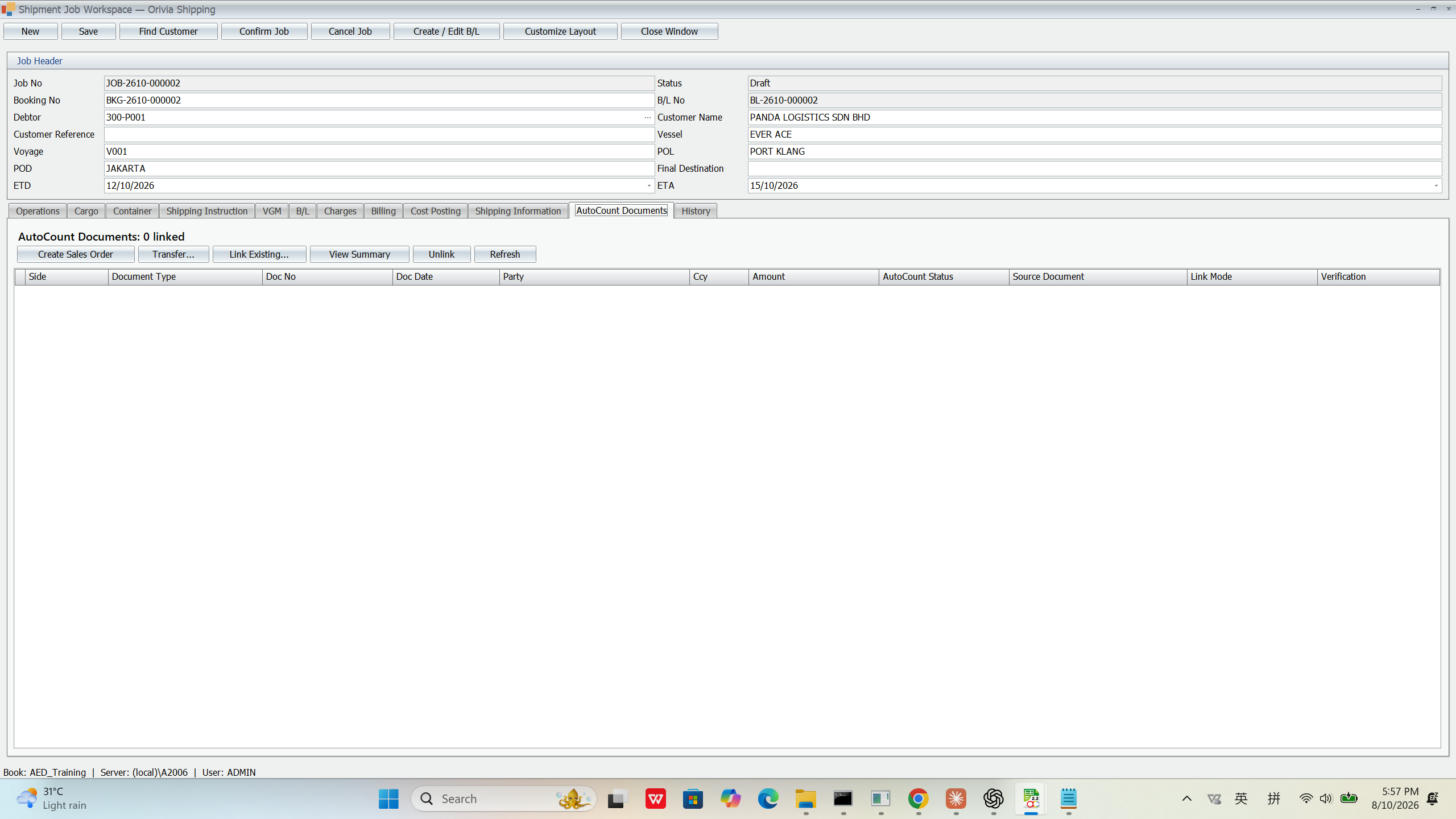
Create the Sales OrderAutoCount Documents tab
👆 Click

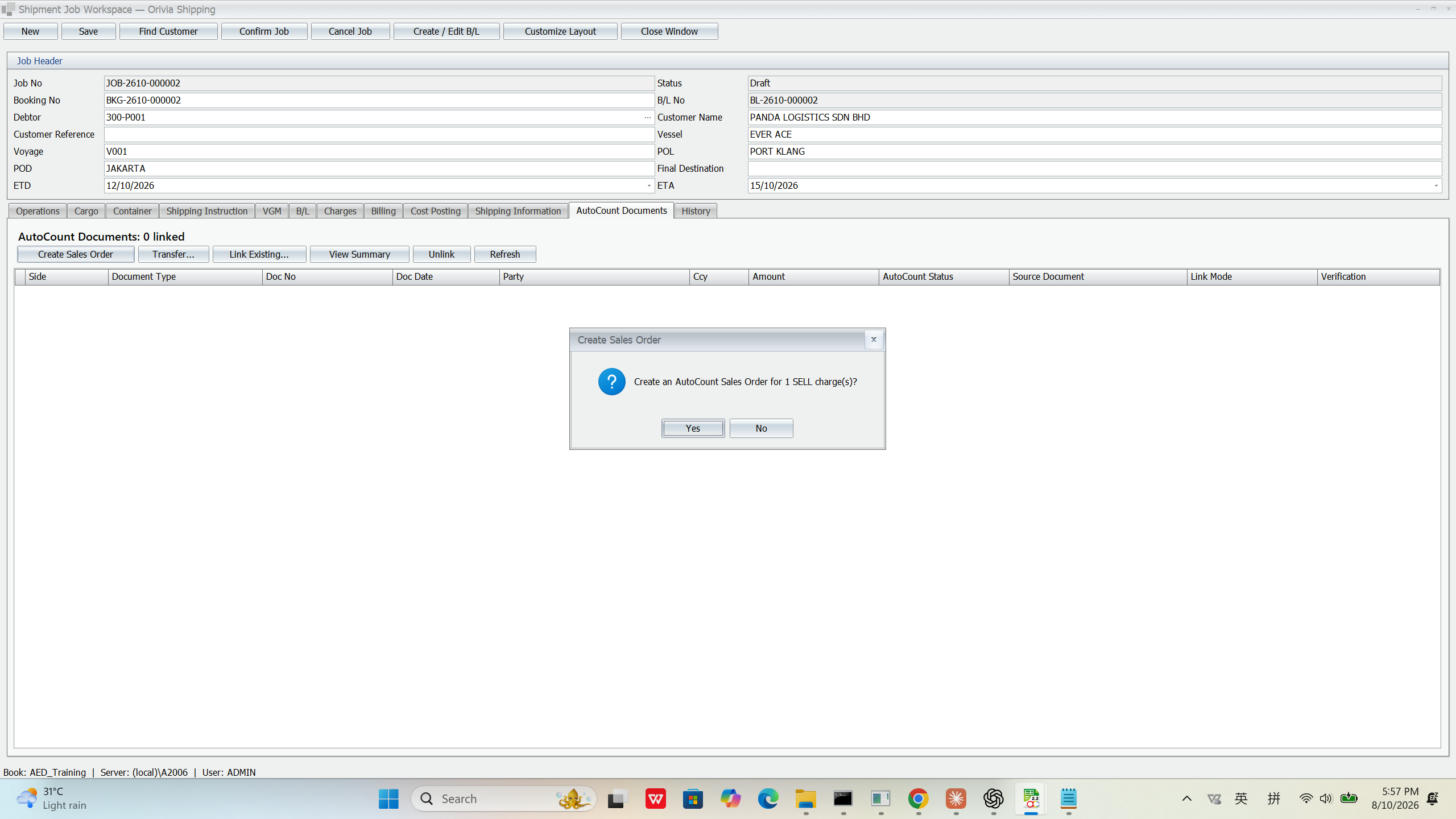
Click the AutoCount Documents tab, then Create Sales Order. Click Yes on the confirmation.

✅ You'll see

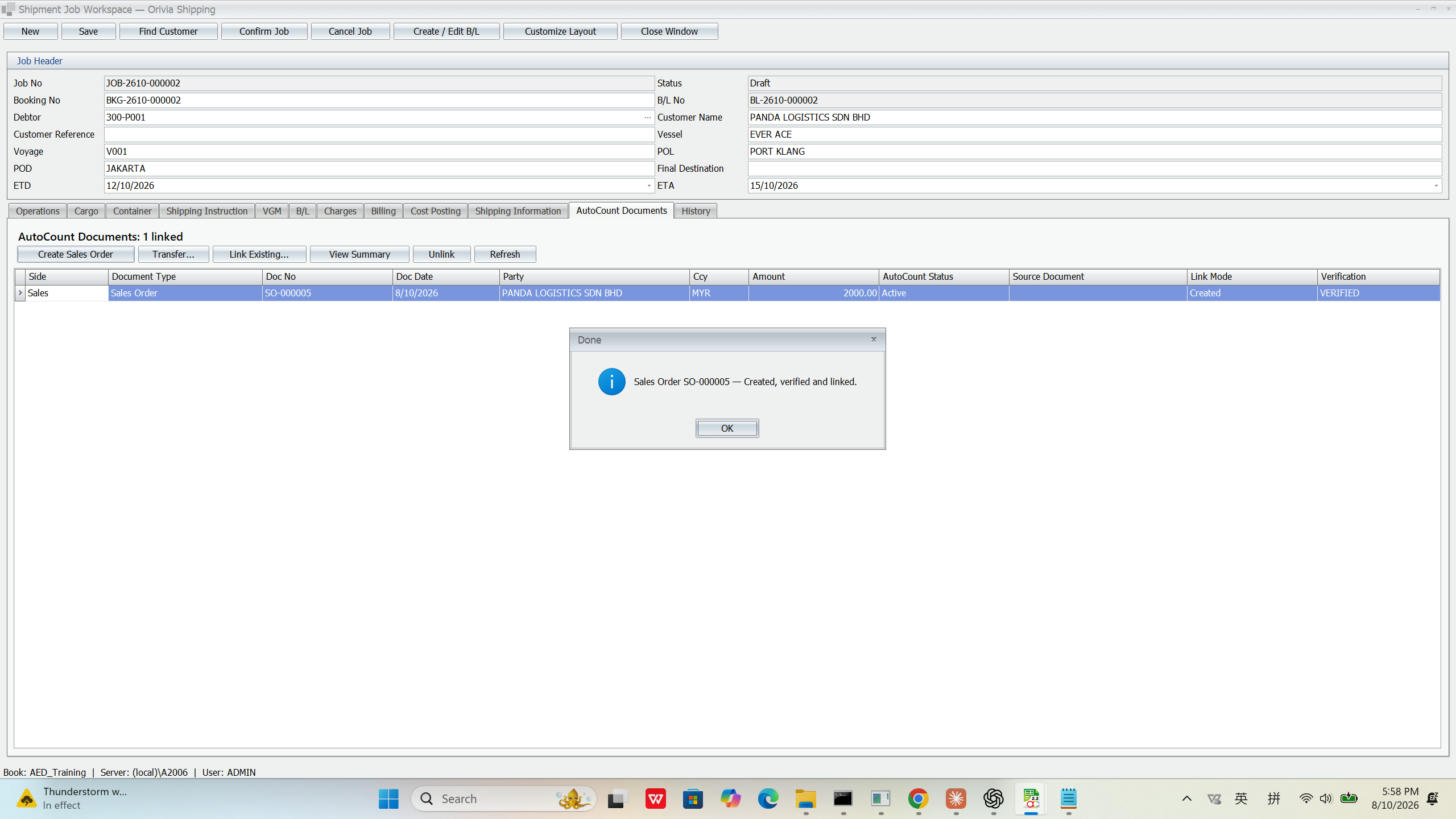
AutoCount formally raises a sales order, e.g. SO-000005, MYR 2000. The row shows VERIFIED — the amount matches the job.

AutoCount Documents tab
AutoCount Documents tab — where operations and accounting connect.
Confirm create SO
Click Create Sales Order, then Yes on the confirmation.
SO created
Sales Order SO-000005 created — VERIFIED, MYR 2000.
Why start from an SO? AutoCount's standard flow is Sales Order → Delivery Order → Invoice, "transferred" down step by step so every document links up and the audit trail is clean. The plugin uses AutoCount's own native transfer — not manual re-typing.
12
Transfer SO → DOTransfer → Delivery Order
👆 Click

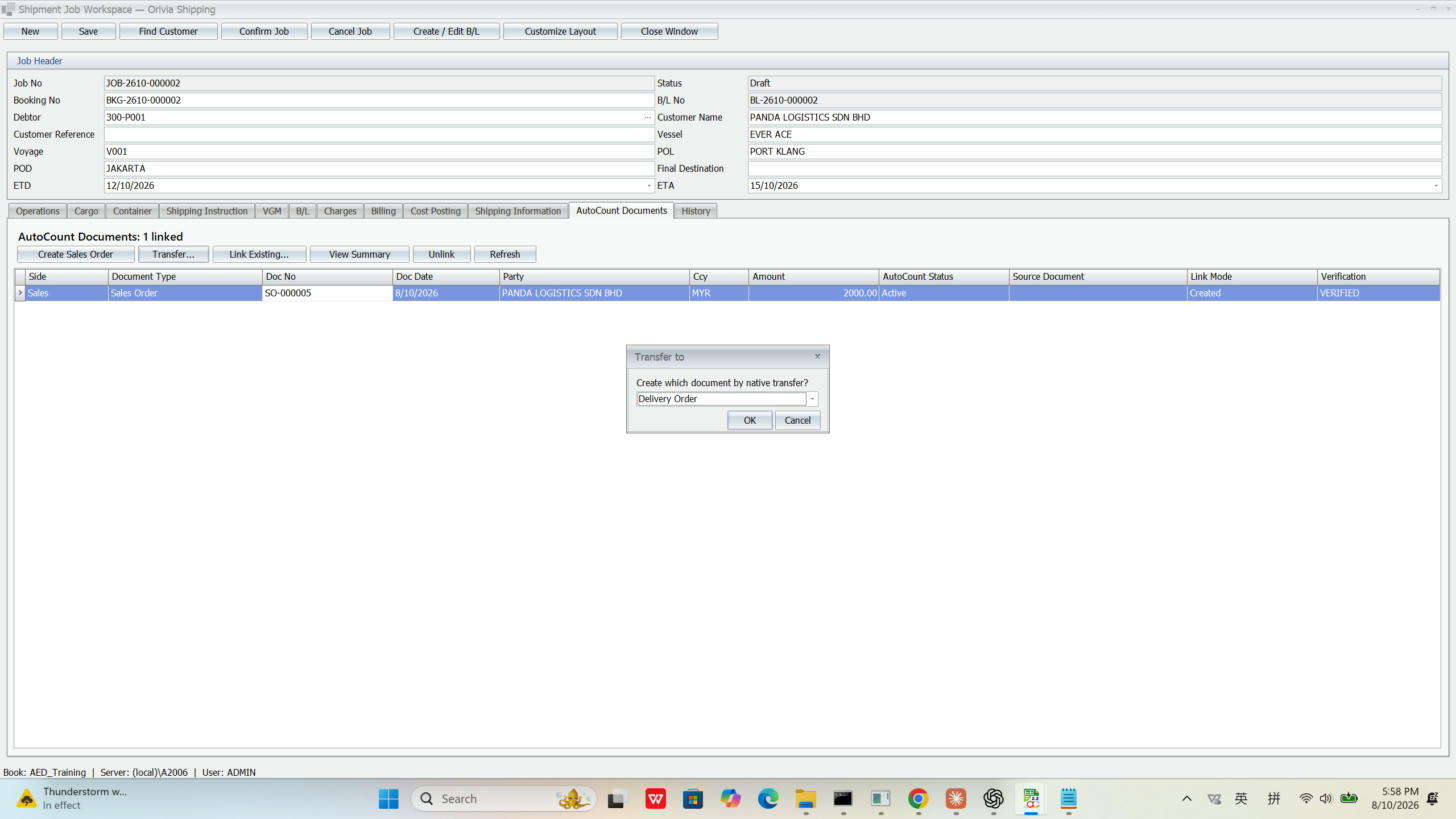
Select the SO row, click Transfer…. In the "Transfer to" dialog pick Delivery Order, click OK, then confirm with Yes.

✅ You'll see

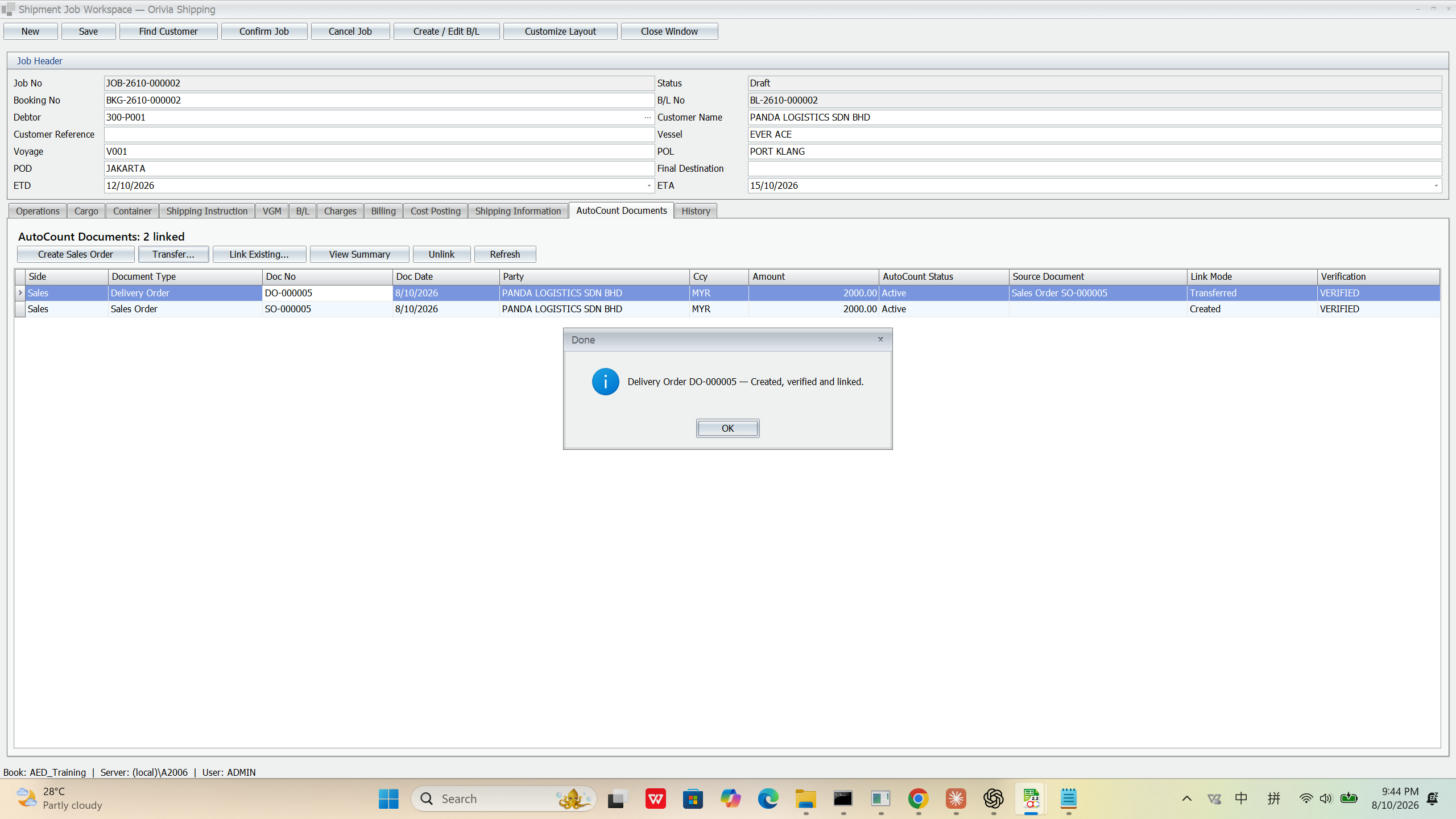
The message Delivery Order DO-000005 — Created, verified and linked. A DO row is added to the list.

Transfer to Delivery Order
In "Transfer to" pick Delivery Order, click OK.
DO created
Delivery Order DO-000005 created, verified and linked.
13
Transfer DO → InvoiceTransfer → Sales Invoice
👆 Click

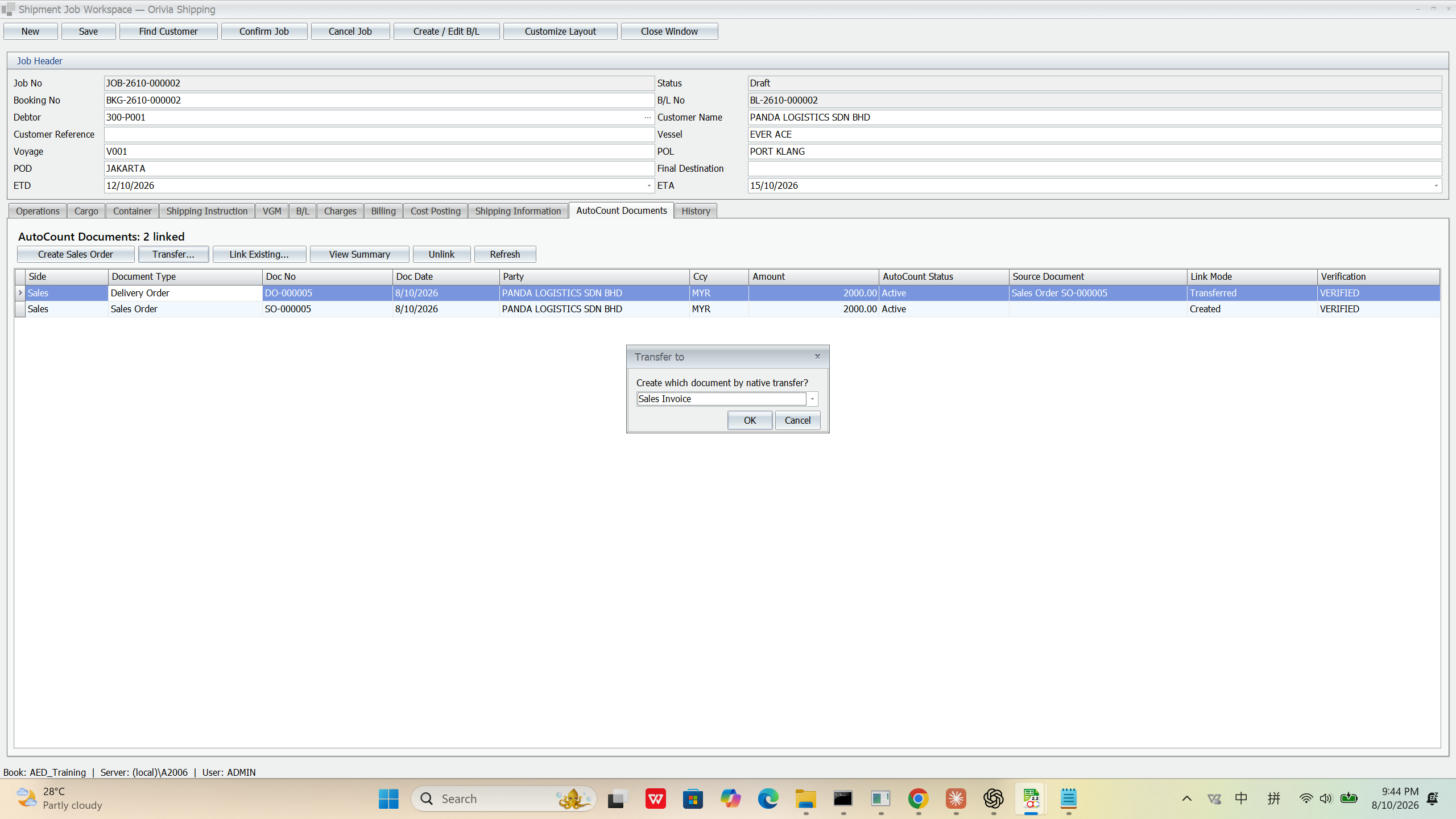
Select the DO row, click Transfer…. This time "Transfer to" defaults to Sales Invoice; click OK → Yes.

✅ You'll see

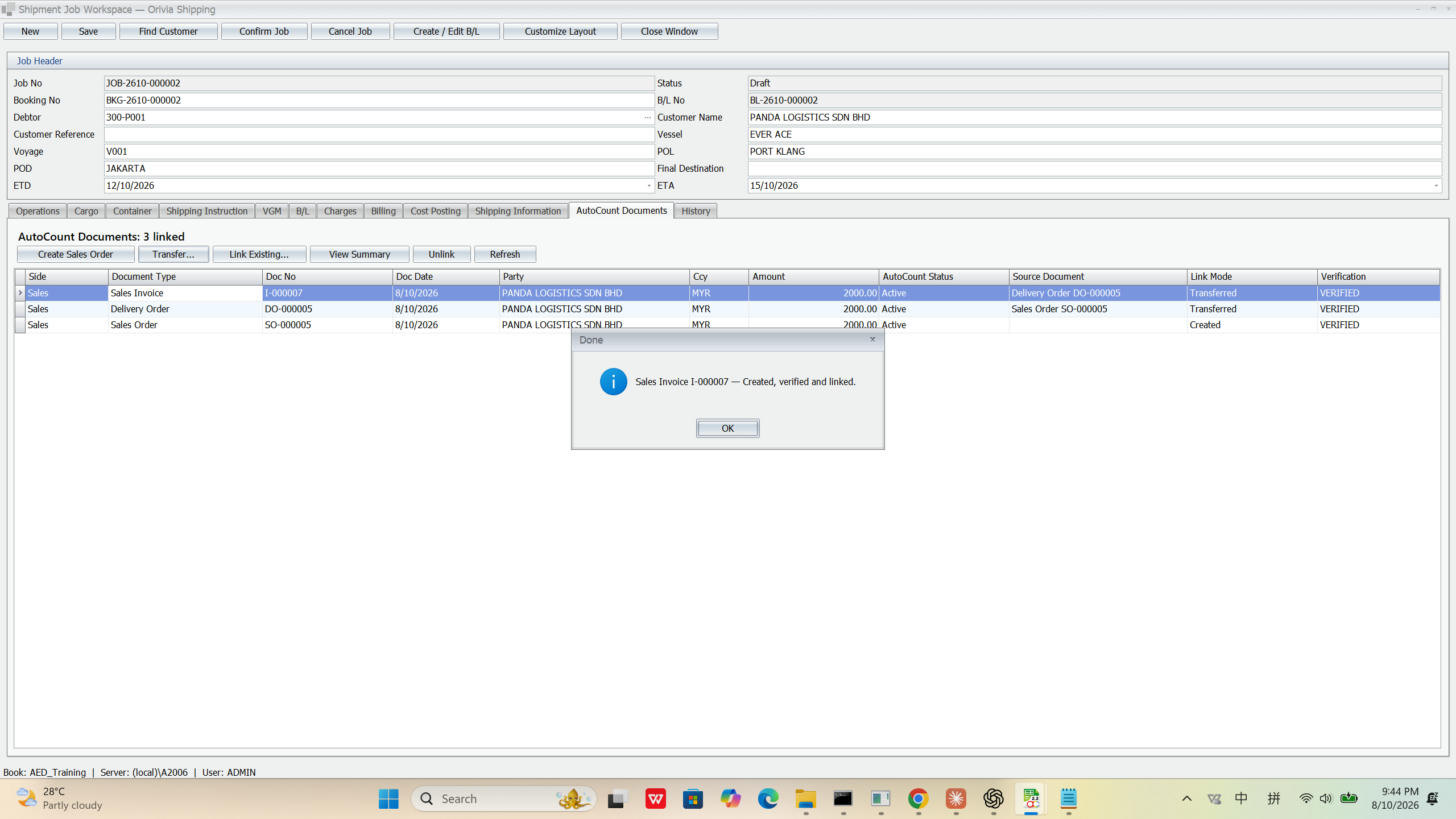
The message Sales Invoice I-000007 — Created, verified and linked. The whole SO → DO → Invoice chain is now complete, every row VERIFIED.

Transfer to Invoice
"Transfer to" defaults to Sales Invoice, click OK.
Invoice created
Invoice I-000007 created — all three documents (SO/DO/Invoice) linked.
When can you raise an Invoice? SELL charges entered + customer resolved → create SO → transfer to DO → transfer to Invoice. Just follow the chain and you're right.
14
View the document chainView Summary
👆 Click

Click View Summary to see a document's origin; finally, click Save to save the job.

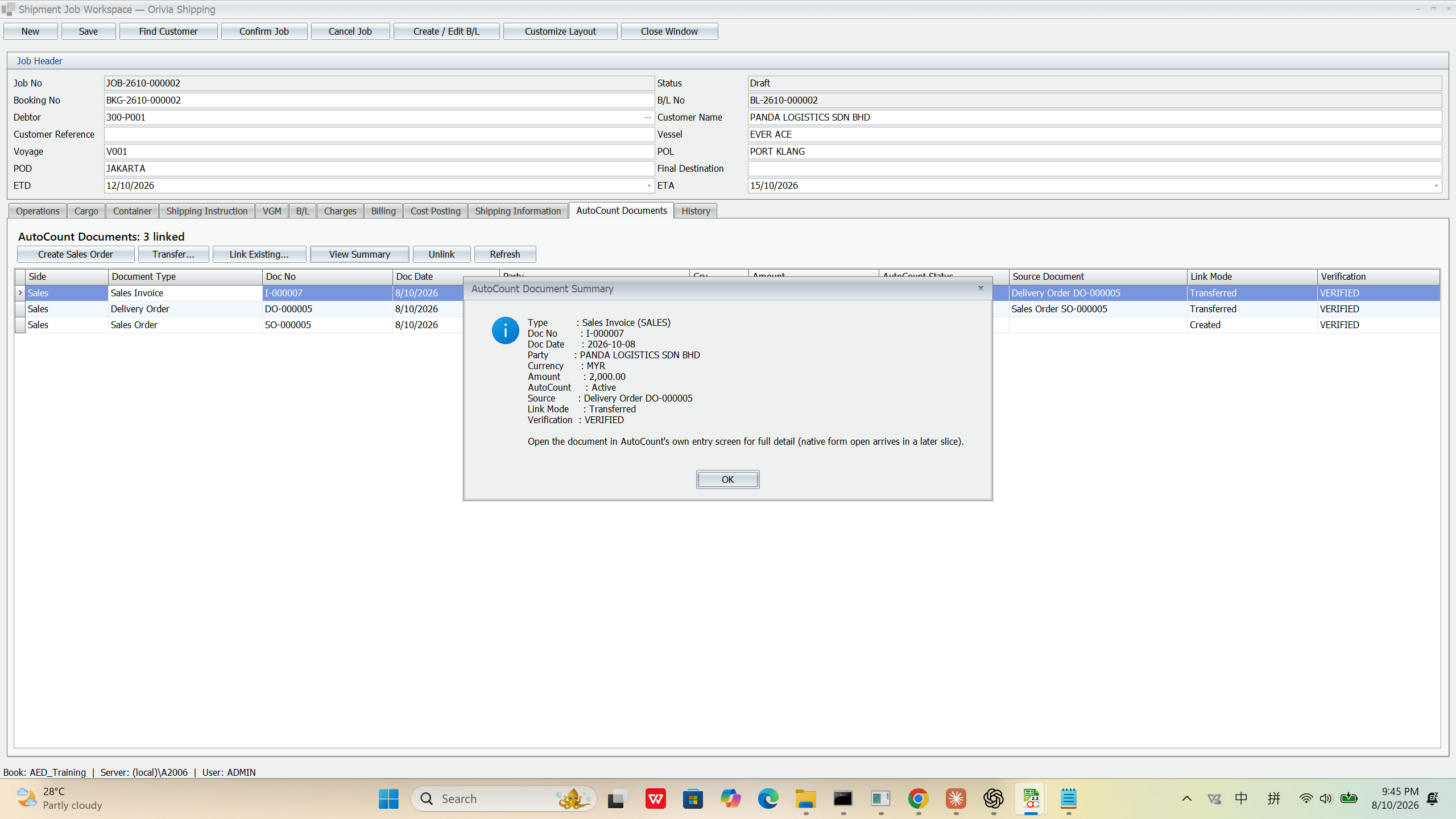
✅ You'll see

A summary: Invoice I-000007, MYR 2000, source Delivery Order DO-000005, VERIFIED. Which document came from where is crystal clear.

Document summary
Document summary — invoice came from DO-000005, fully traceable.
15
Run a reportShipping → Reports
👆 Click

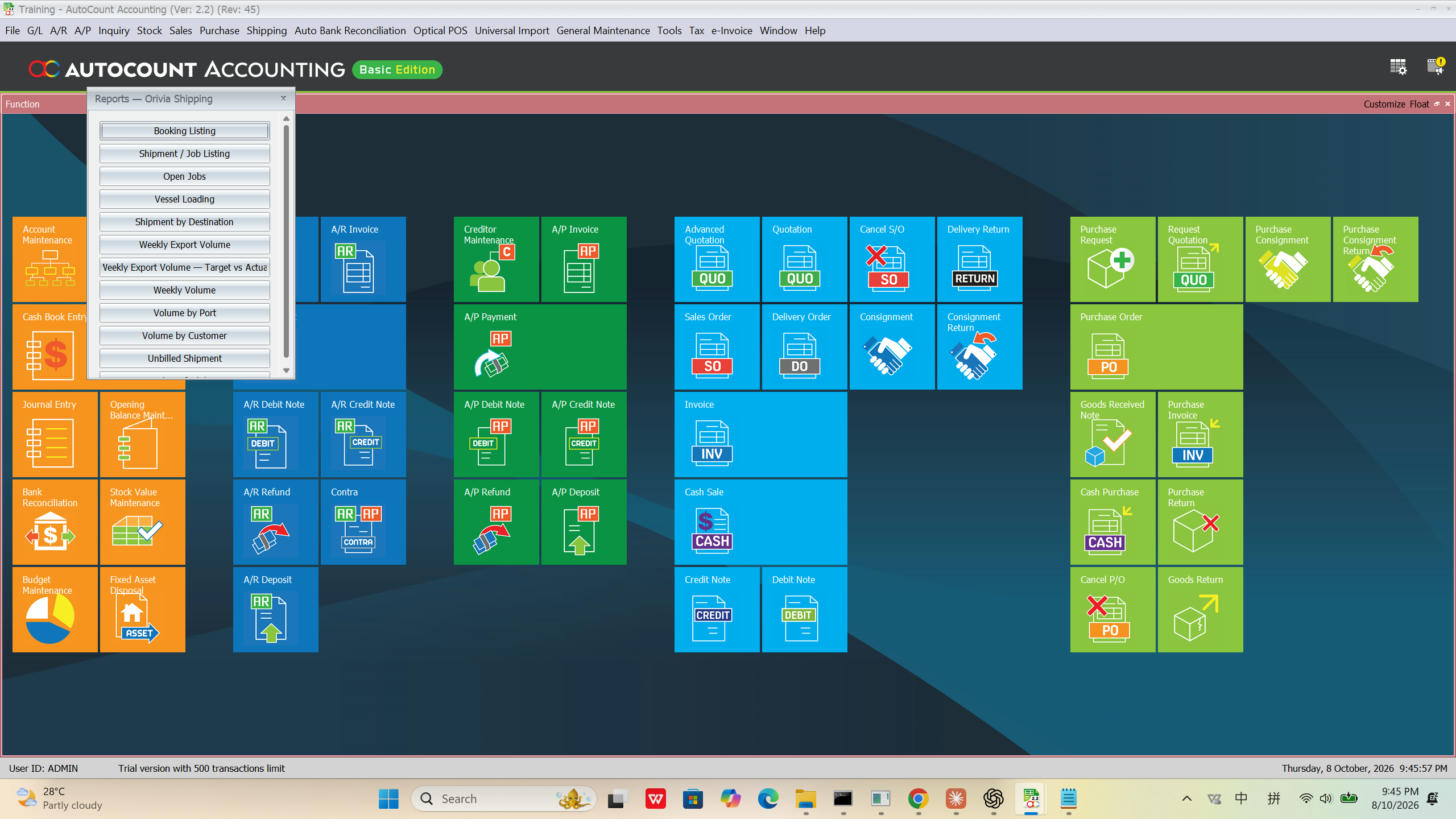
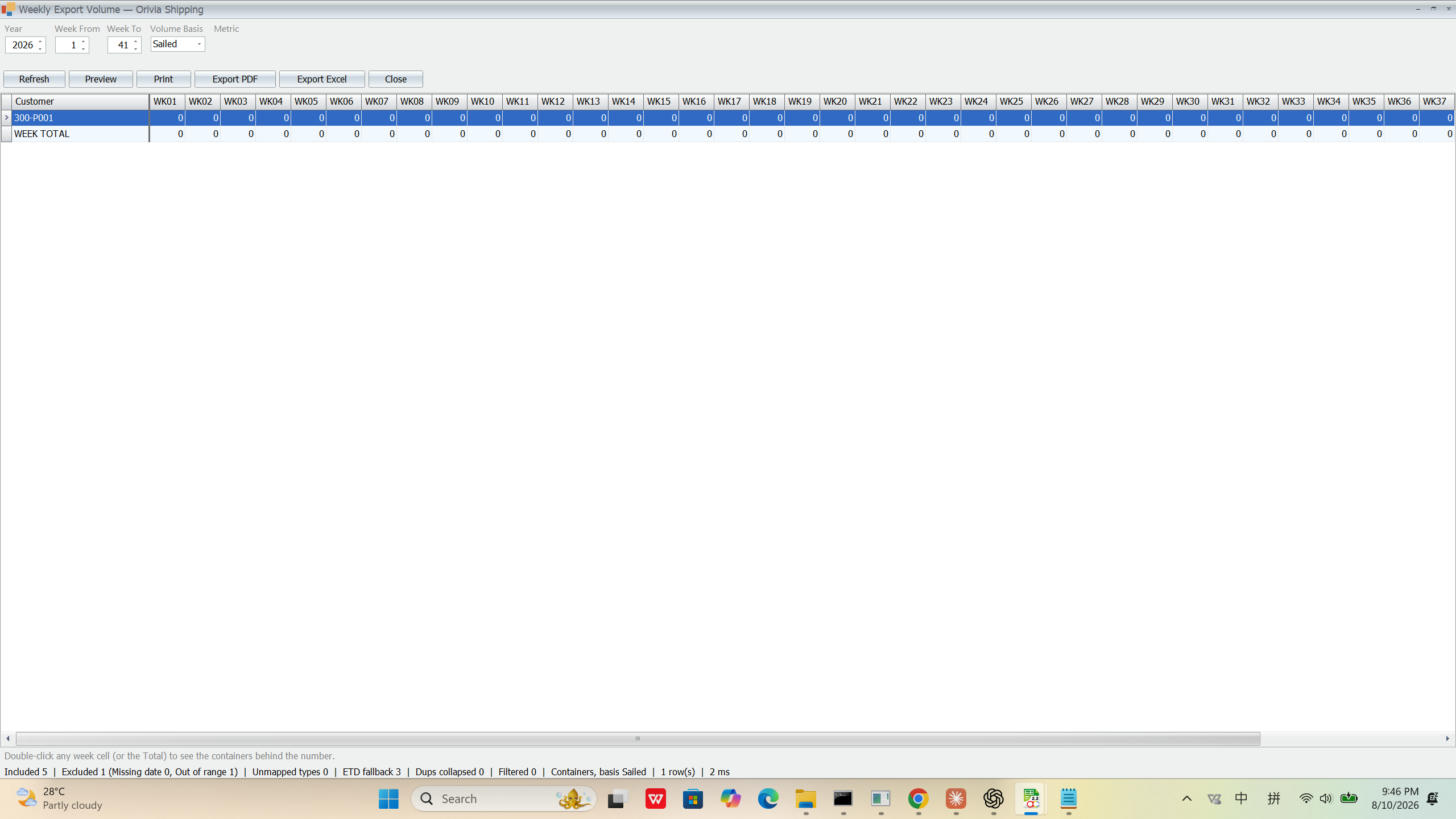
In the Shipping menu click Reports, pick one from the list, e.g. Weekly Export Volume. Set the year / weeks / basis, click Refresh, then Export Excel or Export PDF to export.

✅ You'll see

A "customer × week" volume matrix. The footer shows which containers were included/excluded, and double-clicking a cell reveals the containers behind the number.

Report list
The report list — booking listing, job listing, weekly volume, target vs actual… all here.
Weekly volume report
Weekly Export Volume — one-click export to Excel / PDF; no more manual month-end spreadsheets.
Volume Basis: Sailed = by actual sailing, Loaded = by loading, Booked = by booking. Cargo that hasn't sailed shows 0 under the Sailed basis — that's normal.
Part 2 · Optional

Smart Document Import: let the system read your customer's files

A customer's PDF B/L or Excel no longer needs to be typed character by character. Upload → the system reads the fields → you review → generate documents in one click. The five steps are Upload ▸ Extract ▸ Match ▸ Review ▸ Post.

A
Open Smart Document ImportShipping → Document Import
👆 Click

In the Shipping menu click Document Import.

✅ You'll see

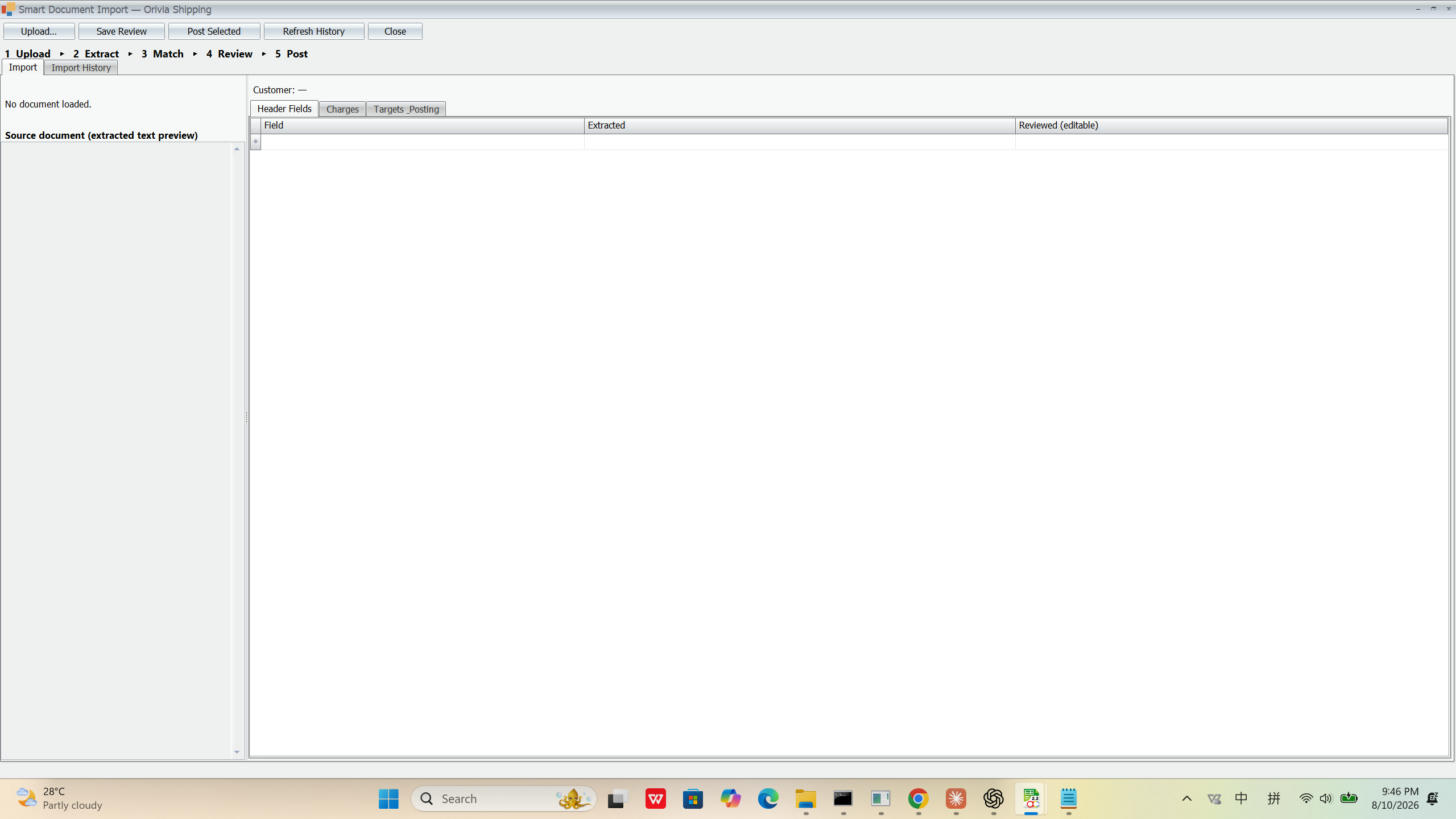
The import window opens; the very top row is the five steps: 1 Upload ▸ 2 Extract ▸ 3 Match ▸ 4 Review ▸ 5 Post. No file yet, so it says "No document loaded".

Import empty state
The import wizard — five steps on top, source text on the left, extracted fields on the right.
B
Upload a customer fileUpload
👆 Click

Click Upload… and choose the customer's PDF or Excel (here: an ATS bill of lading PDF).

✅ You'll see

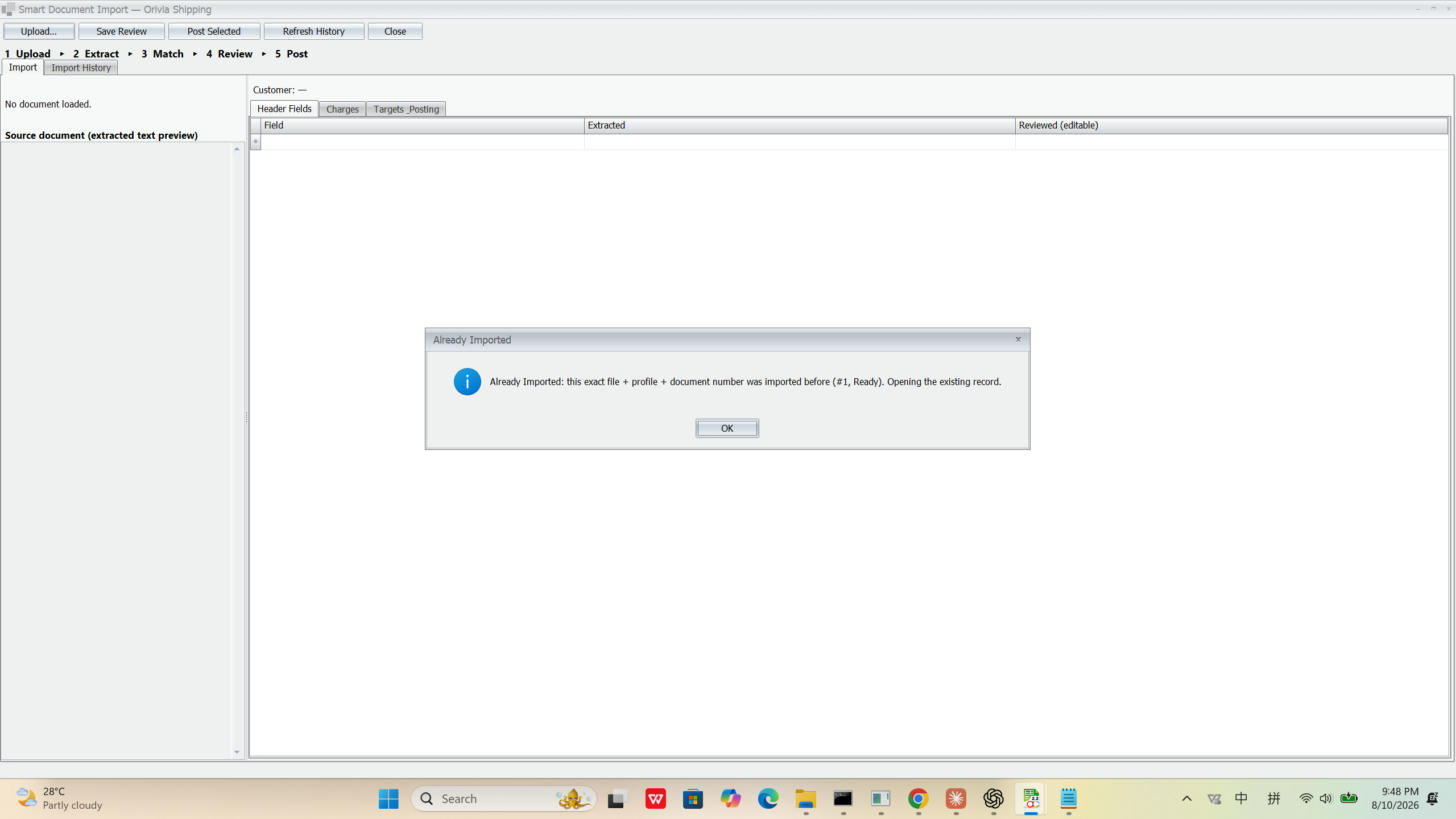
If the file was imported before, the system warns Already Imported and opens that existing record — it won't create a duplicate. That's the safeguard: the same file is never imported twice.

Already imported
De-duplication — re-upload the same file and the system recognises it, opening the old record instead of a new one.
C
Auto-extracted fieldsExtract + Match
✅ You'll see

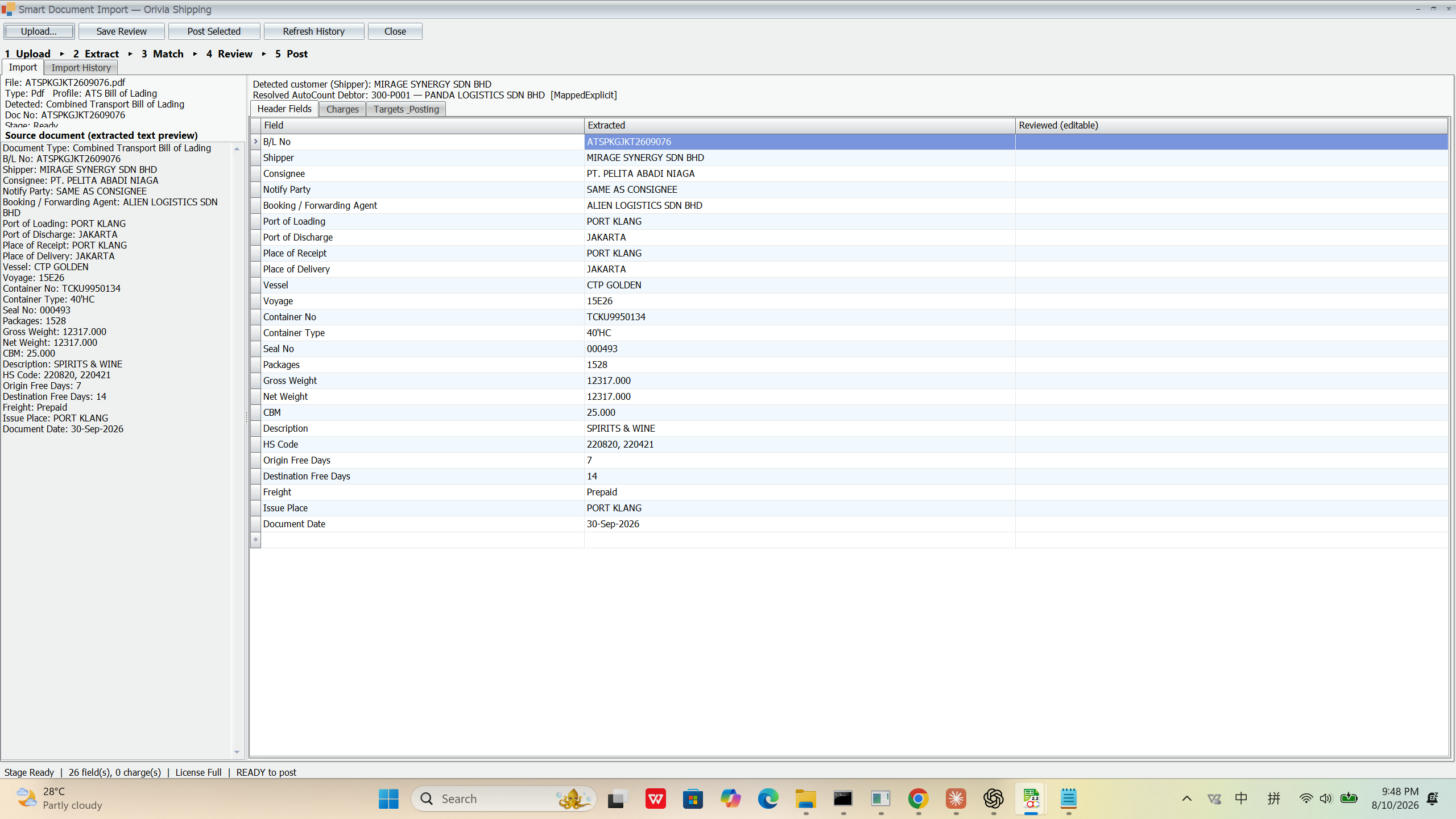
The right side lists the fields read from the file — here 26 fields: B/L No, Shipper, Consignee, POL/POD, Vessel/Voyage, container no/type, packages/weight, HS Code… The left shows the source text for easy comparison.

⌨️ Type

Usually nothing. The top shows the "Detected customer" and auto-matches it to an AutoCount debtor (here 300-P001). You only edit what was read wrong or missed — the system never guesses.

Extracted fields
One PDF → 26 fields read automatically, customer matched to 300-P001, status "READY to post".
D
Check the target documentsTargets & Posting
👆 Click

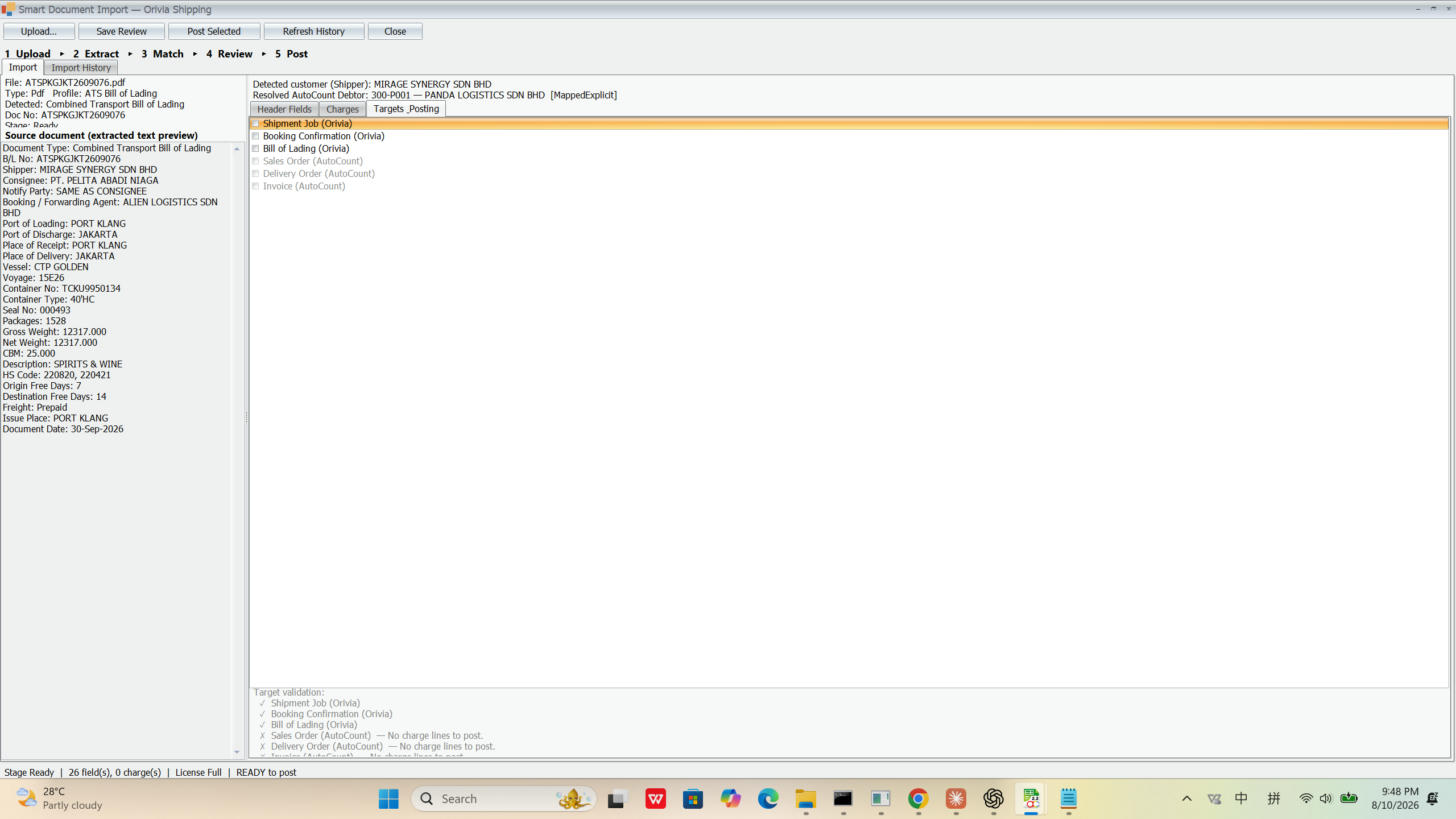
Click the Targets_Posting tab, tick the documents to generate, then click Post Selected.

✅ You'll see

The system lists the possible documents and validates them: here Shipment Job / Booking Confirmation / Bill of Lading (Orivia) are all ✓; but SO / DO / Invoice (AutoCount) are blocked ✗, with a clear reason: No charge lines to post.

Targets and validation
Safety validation — no charges, no invoice. What should be generated is; what shouldn't is held back.
Why designed this way? Invoices touch money and the books, so the system would rather block than raise one by mistake. To raise AutoCount's SO/DO/Invoice, the file must have valid charge lines.
E
Import historyImport History
👆 Click

Click the Import History tab.

✅ You'll see

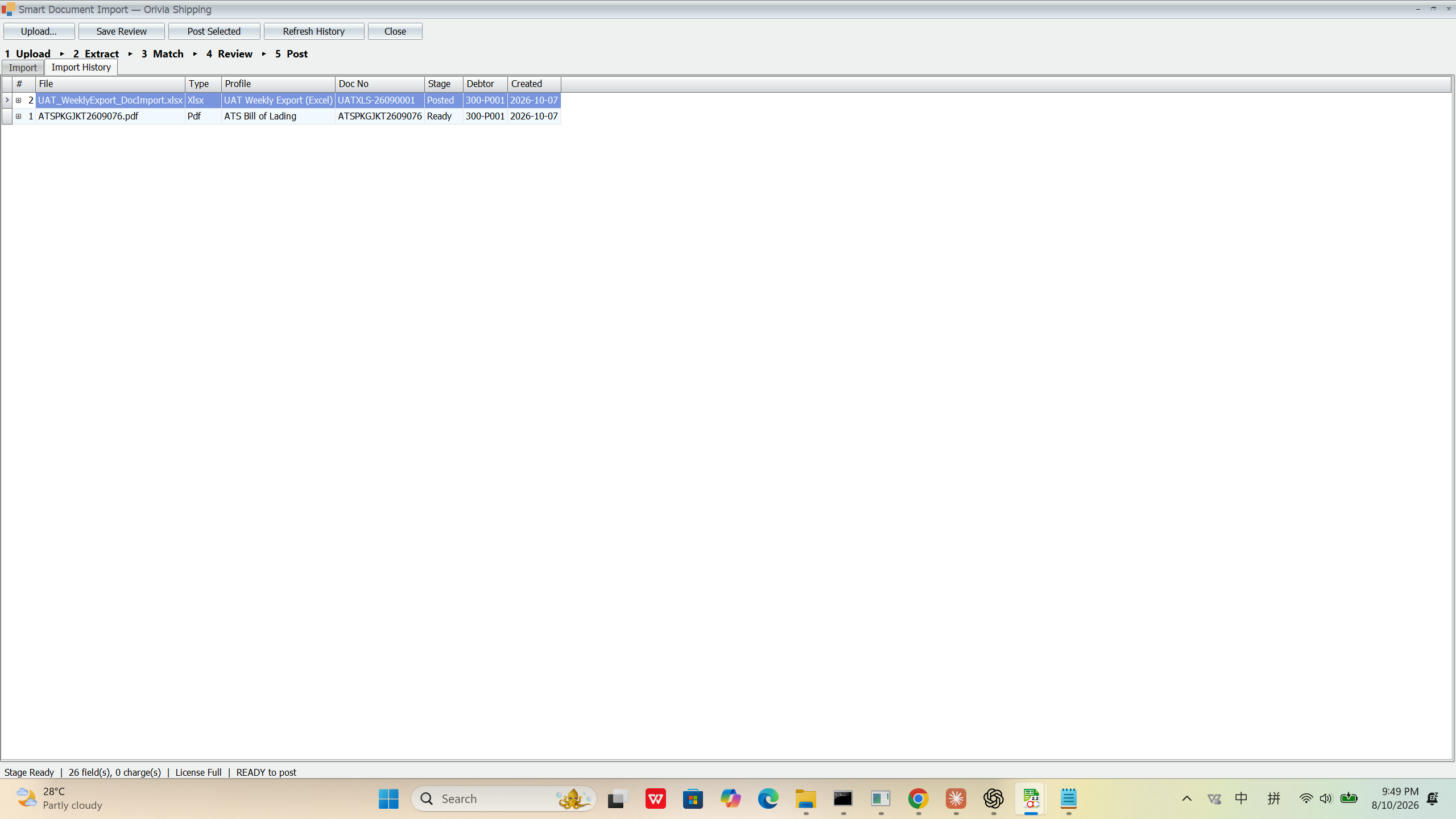
Every import leaves a trail: file name, type, profile used, document number, stage (Ready / Posted), customer, date. You can always check who imported what, when, and whether it was posted.

Import history
Import history — one Excel already Posted, one PDF Ready, fully auditable.
Appendix

Remember these one-liners

Book first, then open the jobAsking for space → Booking; actually operating cargo → Shipment Job.
A B/L is a document, not a billThe Bill of Lading is for the carrier/customer; to get paid you raise an invoice.
Enter charges before you can billRecord a SELL charge → then there's an invoice amount.
SO → DO → Invoice, transfer downUse AutoCount's native transfer; every doc links, no retyping.
Type data onceWhat you enter on the booking carries into the job, B/L and reports.
VERIFIED means you're safeIt means the amount matches and the document is linked.
Appendix

FAQ

The numbers don't match the screenshots — did something go wrong?

No. BKG / JOB / SO / DO / Invoice numbers count upward automatically, so different numbers on your screen are completely normal as long as the flow matches.

What's the difference between Booking, Shipment Job and Bill of Lading?

Booking = reserve a slot (open it when the customer wants space/a container); Shipment Job = the master file for this shipment (where you actually operate cargo, record charges and issue documents); Bill of Lading = the transport document (for the carrier/customer), not a bill.

When can I raise an Invoice?

First record the "charge the customer" (SELL) lines in the job's Charges tab → create a Sales Order in AutoCount Documents → transfer to Delivery Order → transfer to Sales Invoice. With no charge lines, the system blocks it.

Why go SO → DO → Invoice instead of invoicing directly?

It's AutoCount's standard document flow — each document links, the audit trail is clean. The plugin uses AutoCount's own "transfer" feature: the amount carries over and is auto-verified (VERIFIED), not re-typed, so nothing is miscalculated.

Will Smart Document Import import the same file twice?

No. It remembers imported files; re-uploading one shows "Already Imported" and opens the old record. To raise AutoCount's SO/DO/Invoice, the file must also have valid charge lines, otherwise it's held back.

Can I stop halfway? Will I lose anything?

You can stop, and you won't lose anything. Each Save writes to the database; close the window and reopen it tomorrow from the list to continue.

The report shows 0?

Usually a "basis" issue. The weekly volume report defaults to the Sailed basis, so cargo not yet sailed shows 0; switch to Booked, or check again after sailing.